
The school backoffice is where you run the school from a laptop: people, classes, the timetable, attendance, fees and messages. Teachers mostly use the Communex app on their phones, and parents use the same app to see the timetable, pay and apply for leave.
Work through the guide in order the first time. Every part has screenshots, and the key tasks have a short video. The screens show a fictional school called Demo Academy.
Sign in and find your way around
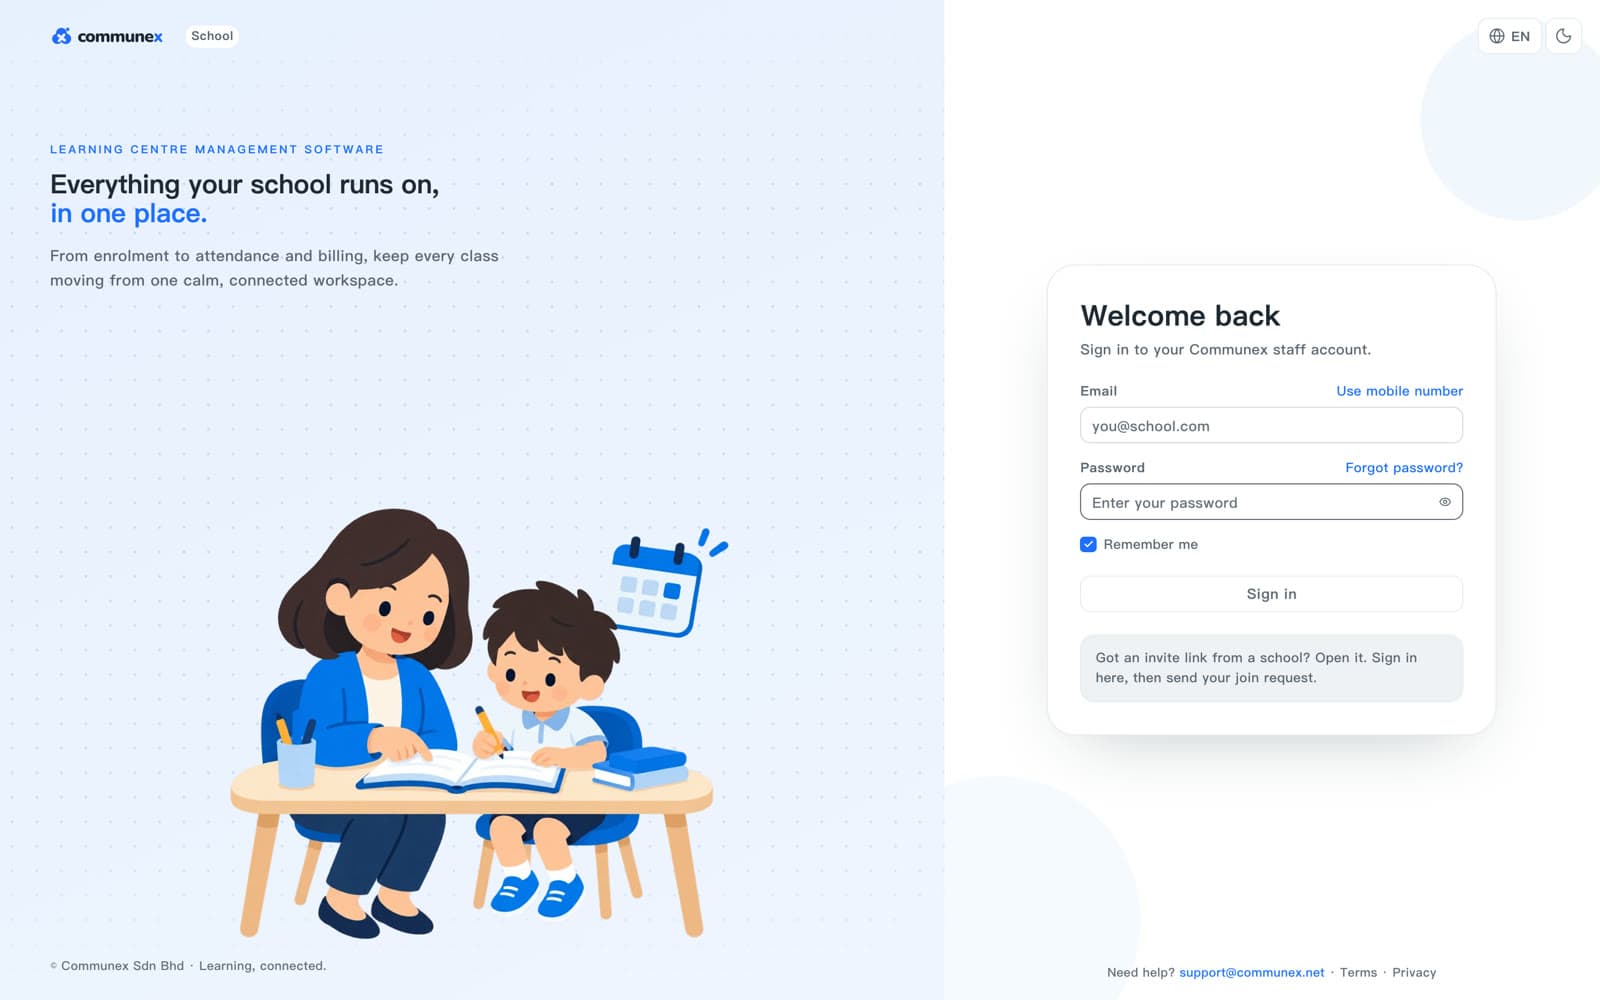
Sign in at school.communex.net and start from the Today page.
- Go to school.communex.net.
- Enter your Email and Password, then click Sign in. If you signed up with a phone number, click Use mobile number instead.
- Forgot your password? Click Forgot password? and we'll email you a code.
After you sign in you land on Today. The top row shows today's sessions, how many are live now, how many students are on today's rosters and how many sessions still need attendance. The cards on the right show revenue, fees still to collect, new students and attendance for the period you pick.
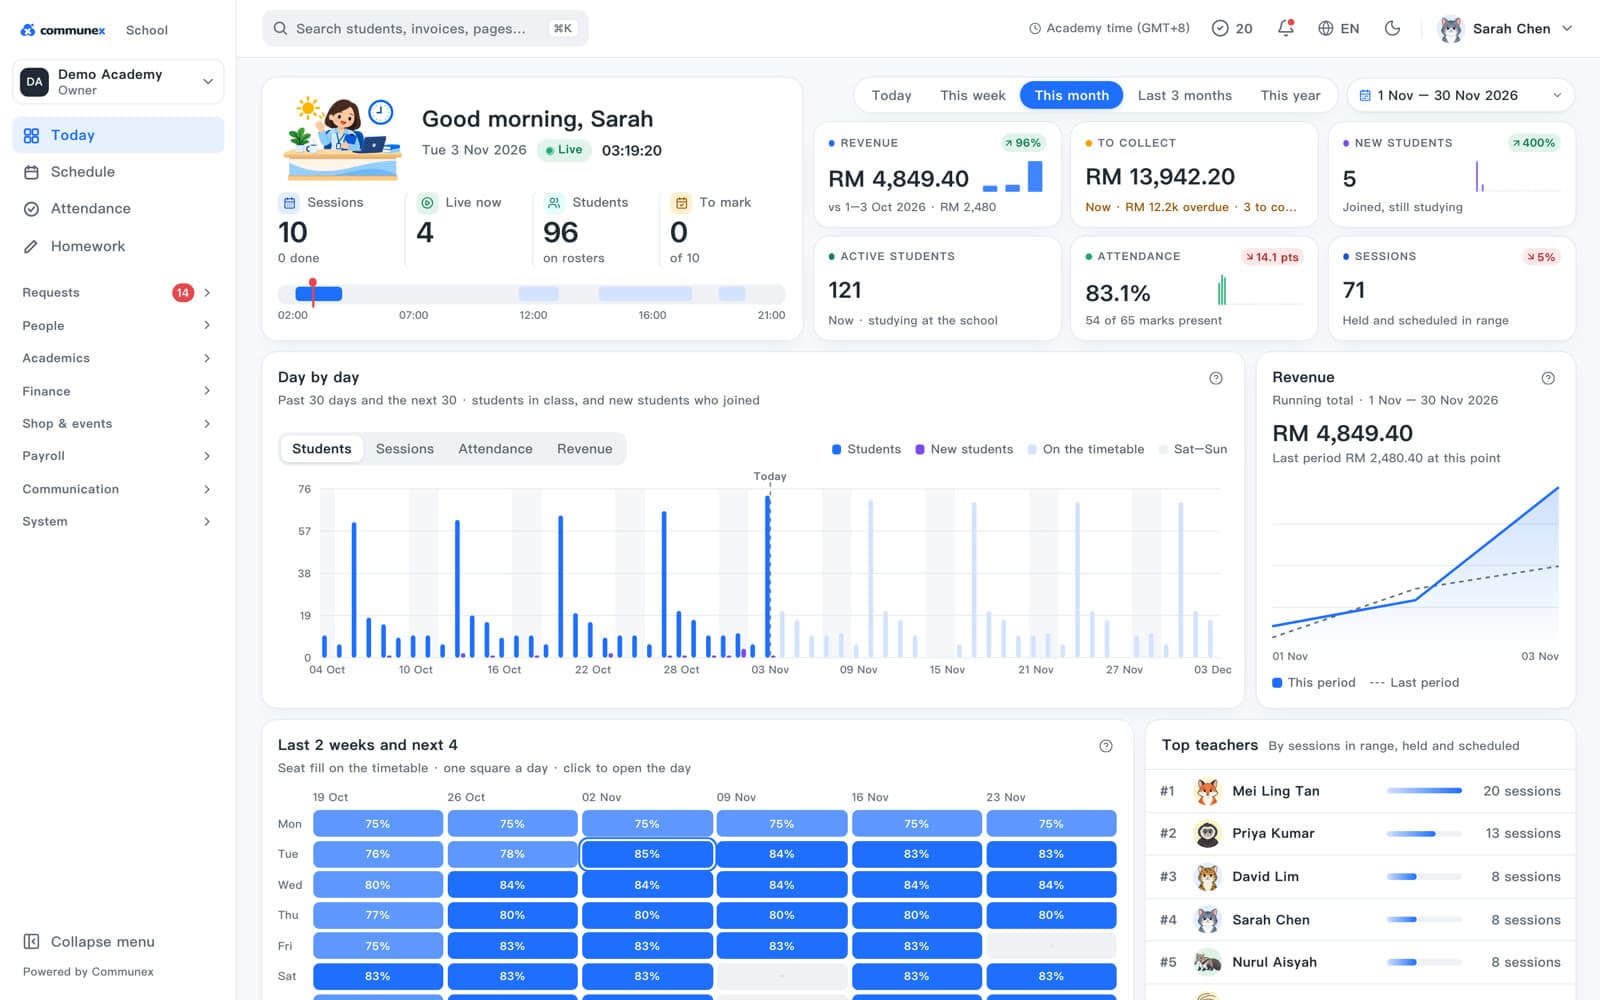
- Today, Schedule, Attendance and Homework sit at the top of the menu because you'll open them every day.
- Requests collects everything someone is waiting on: approvals, leave, make-up classes, payment proofs and students leaving. The red number is how many are waiting.
- People, Academics, Finance, Shop & events, Communication and System open when you click them.
- The search box at the top finds students, invoices and pages. Press Ctrl + K (Cmd + K on a Mac) to jump to it.
- Switch the language (EN, 中文, BM) and light or dark mode from the top bar.
Set up your school profile, payment methods and holidays
Do these once before you add anyone, so invoices, receipts and the timetable come out right.
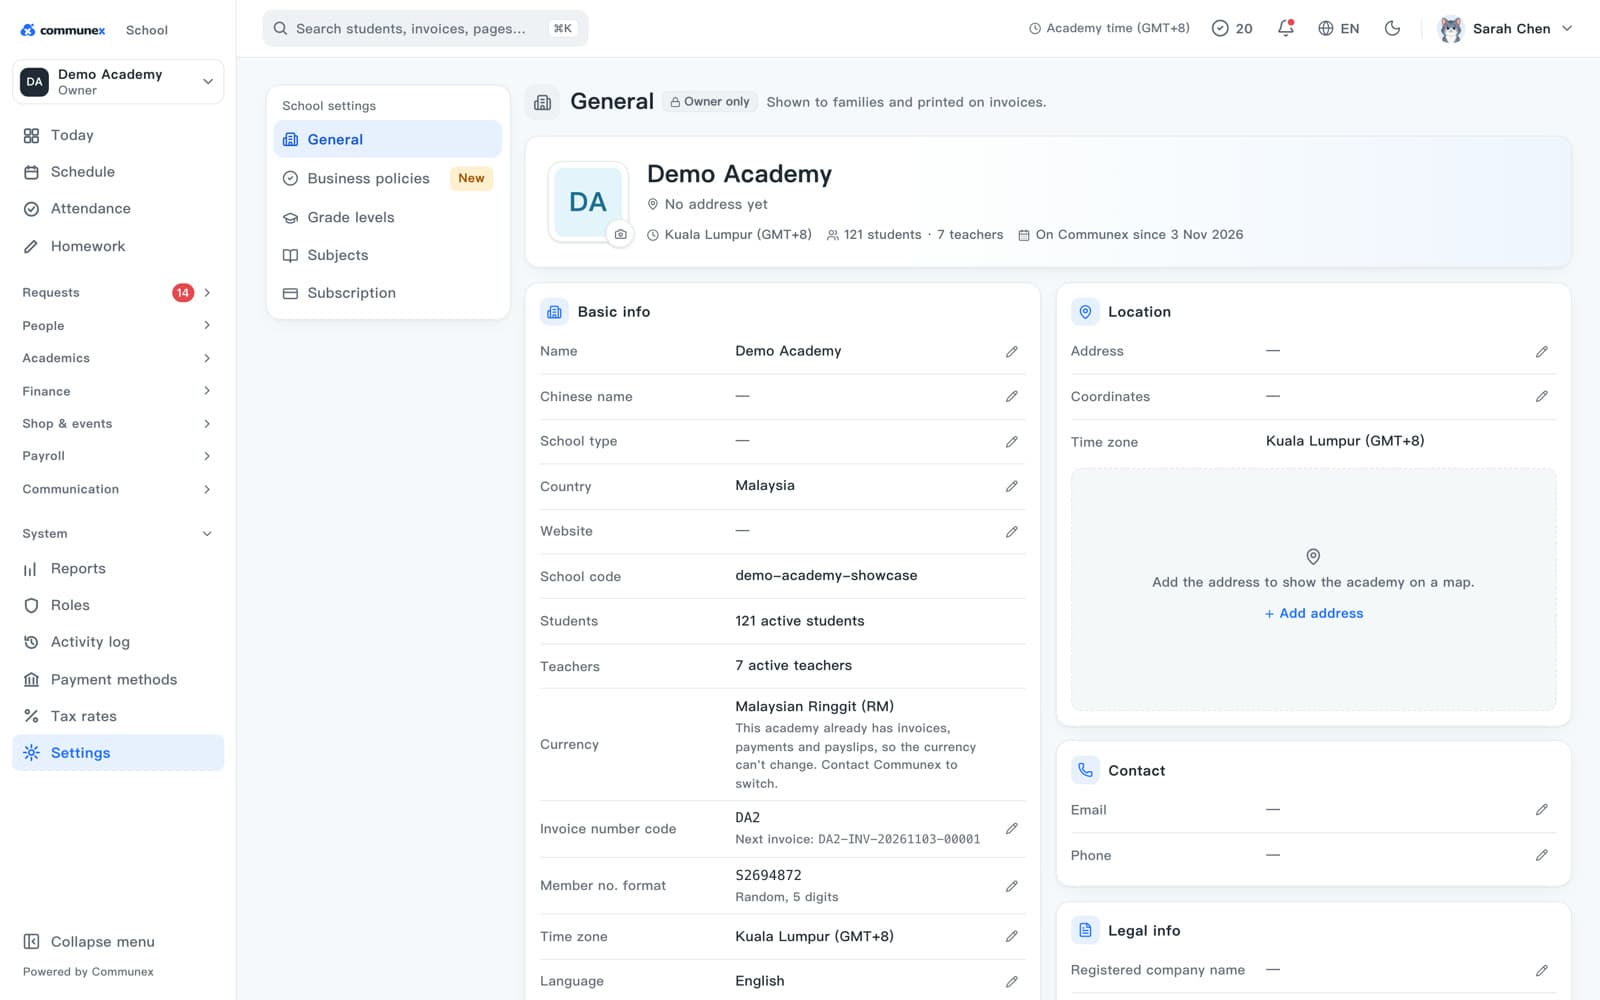
Your school profile appears on invoices, receipts and the parent app. Fill it in first.
- In the left menu, open System and click Settings.
- On General, fill in the school name, currency, time zone and language, then your address and contact details.
- Check the invoice number code and the member number format. Invoices and receipts are numbered from these.
- Use the other tabs for Business policies, Grade levels and Subjects.
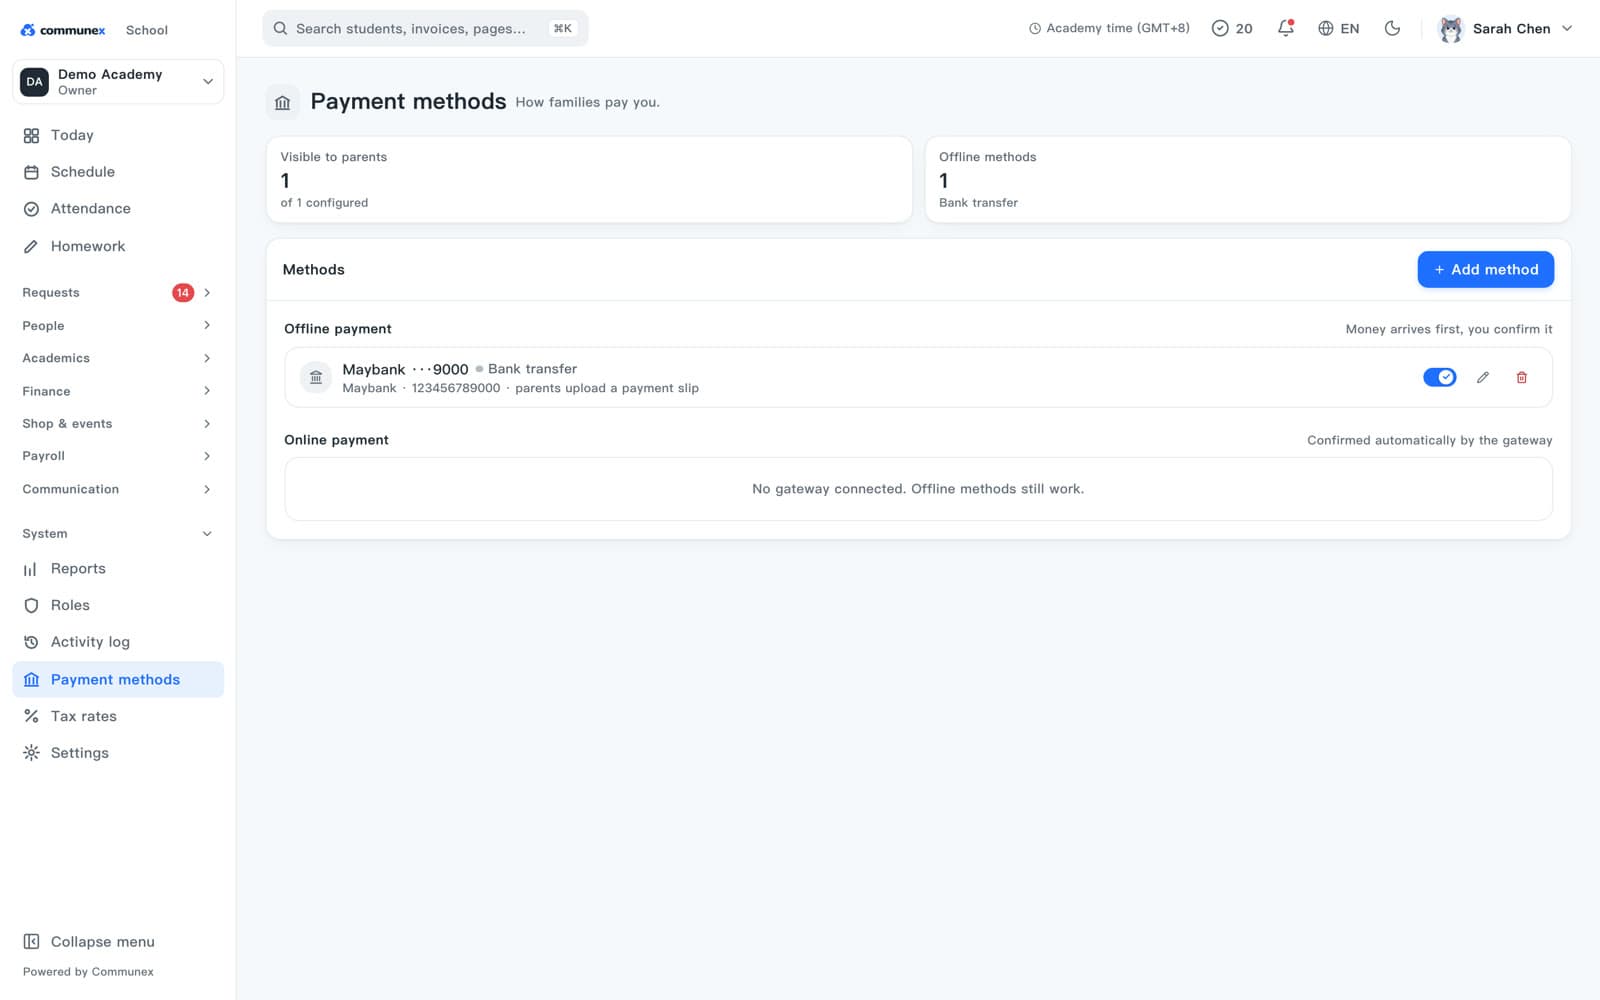
Next, tell parents how they can pay. Bank transfer, cash and other offline methods are listed on the Payment methods page; parents see the ones you switch on in the app.
- Open System → Payment methods.
- Click Add method, choose the type (for example bank transfer) and enter the bank name, account holder and account number.
- Turn on the switch to show the method to parents.
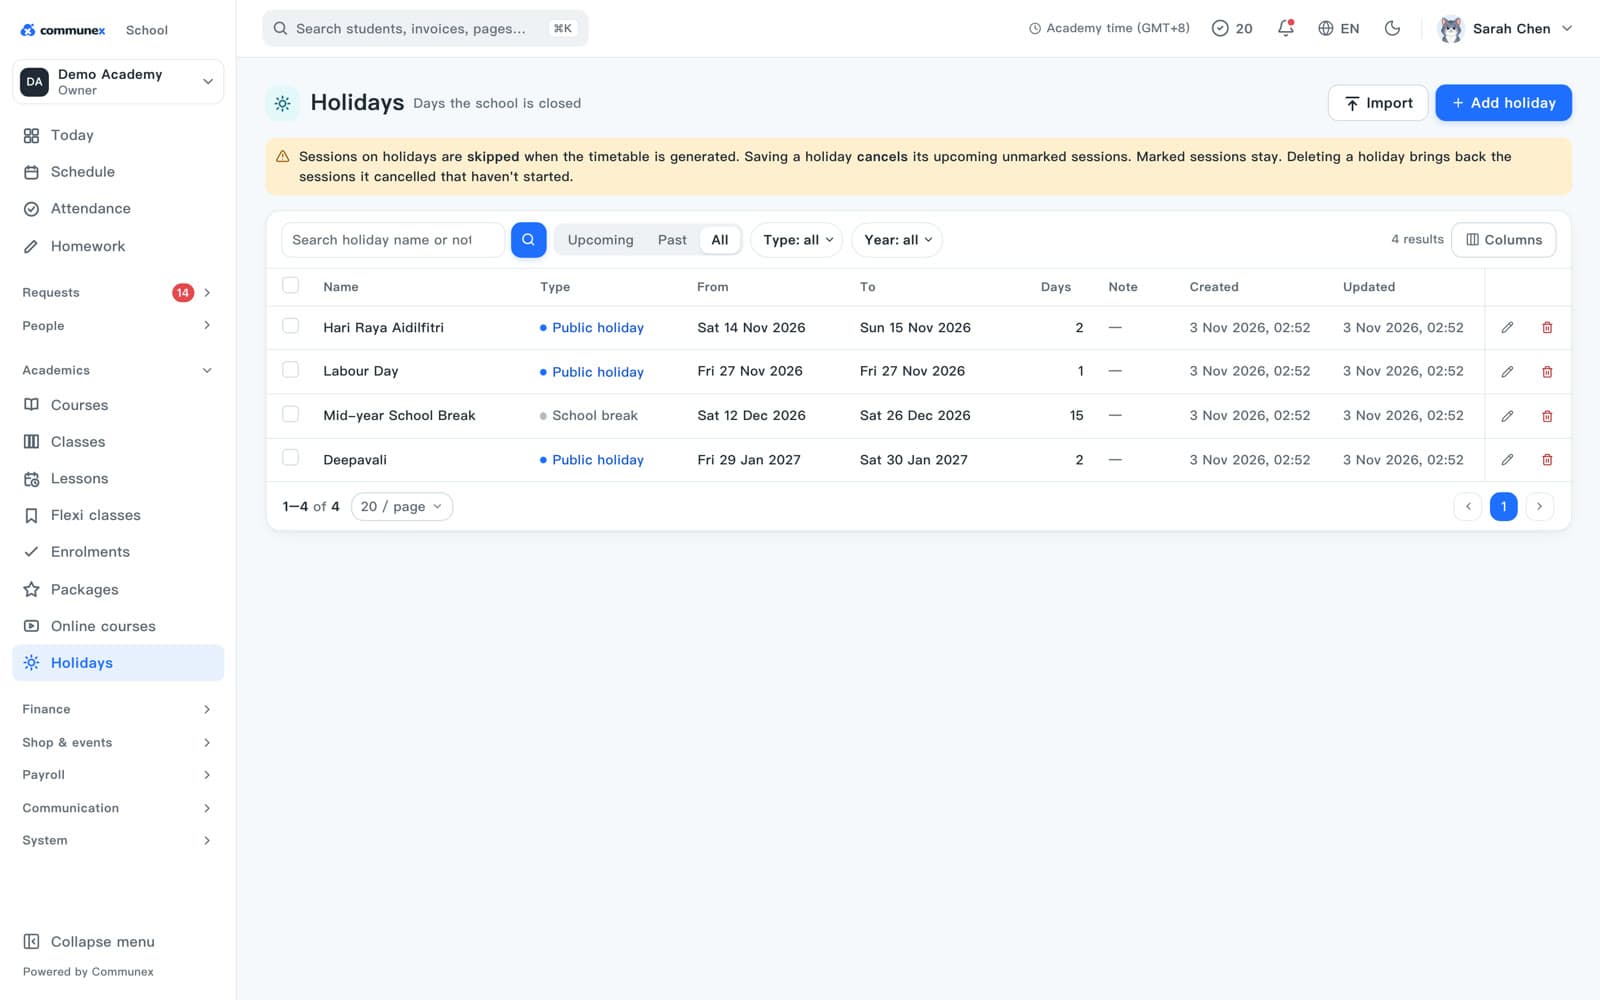
Finally, add public holidays and school breaks. Classes that fall on a holiday are skipped automatically, so no one has to cancel them by hand.
- Open Academics → Holidays.
- Click Add holiday, give it a name and pick the dates. Use Import to add many at once.
Add teachers and decide what they can do
Create teacher accounts, then use roles to control which pages and buttons each person sees.
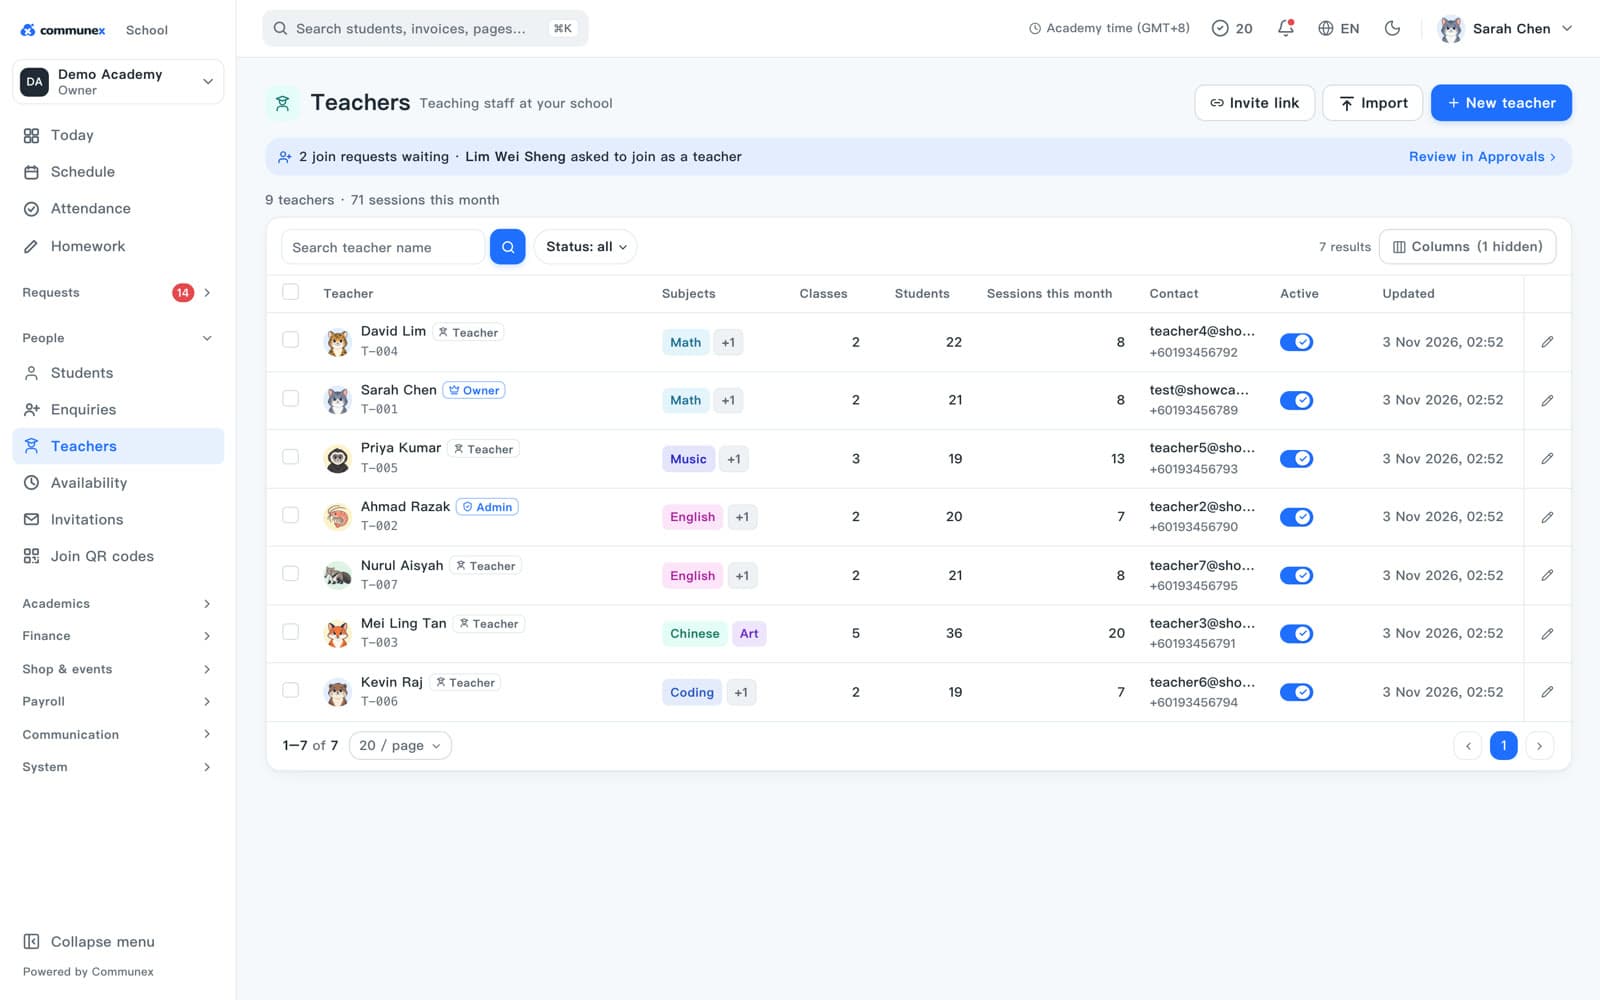
- Open People → Teachers.
- Click New teacher and fill in their name, email or mobile number and subjects. Or click Invite link to send a link, or Import to add many from a spreadsheet.
- Give the new teacher their temporary password. They set their own password the first time they sign in, on the web or in the app.
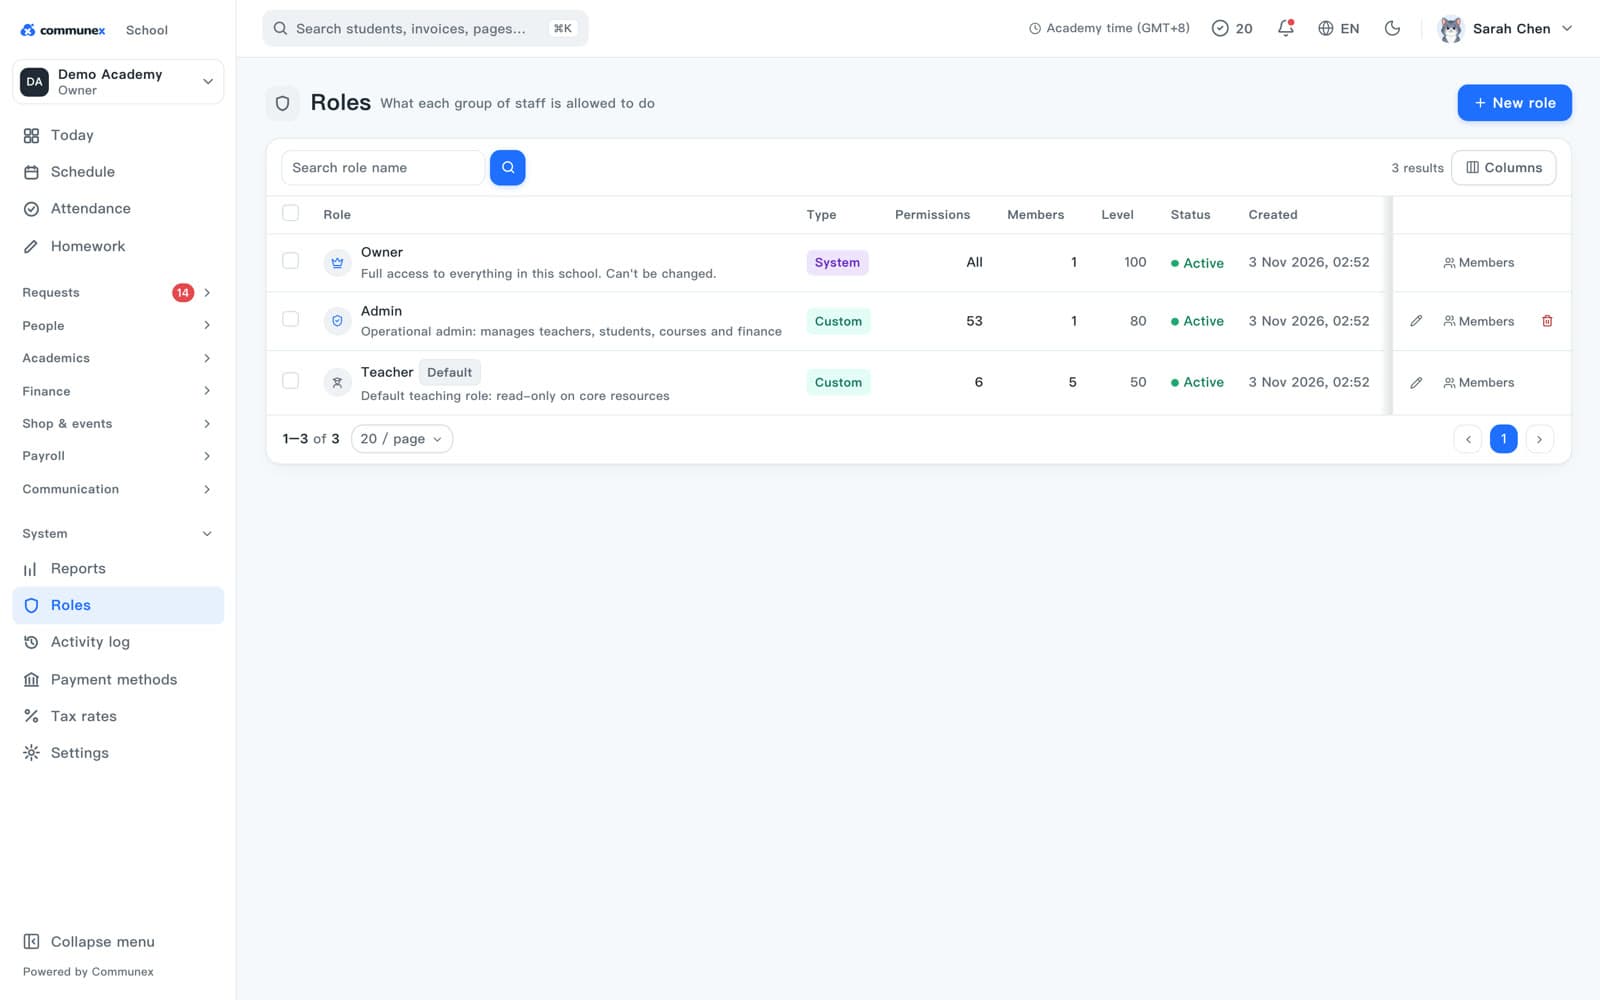
Roles decide what each person can see and do. Communex comes with three:
- Owner: everything, including settings and the subscription.
- Admin: runs the school day to day: students, classes and fees.
- Teacher: their own classes, attendance, homework and students. This is the default for new teachers.
- Open System → Roles.
- Click a role to see its permissions, or click New role to make your own (for example a front desk role that can take payments but not change settings).
- Open a teacher's profile to change their role.
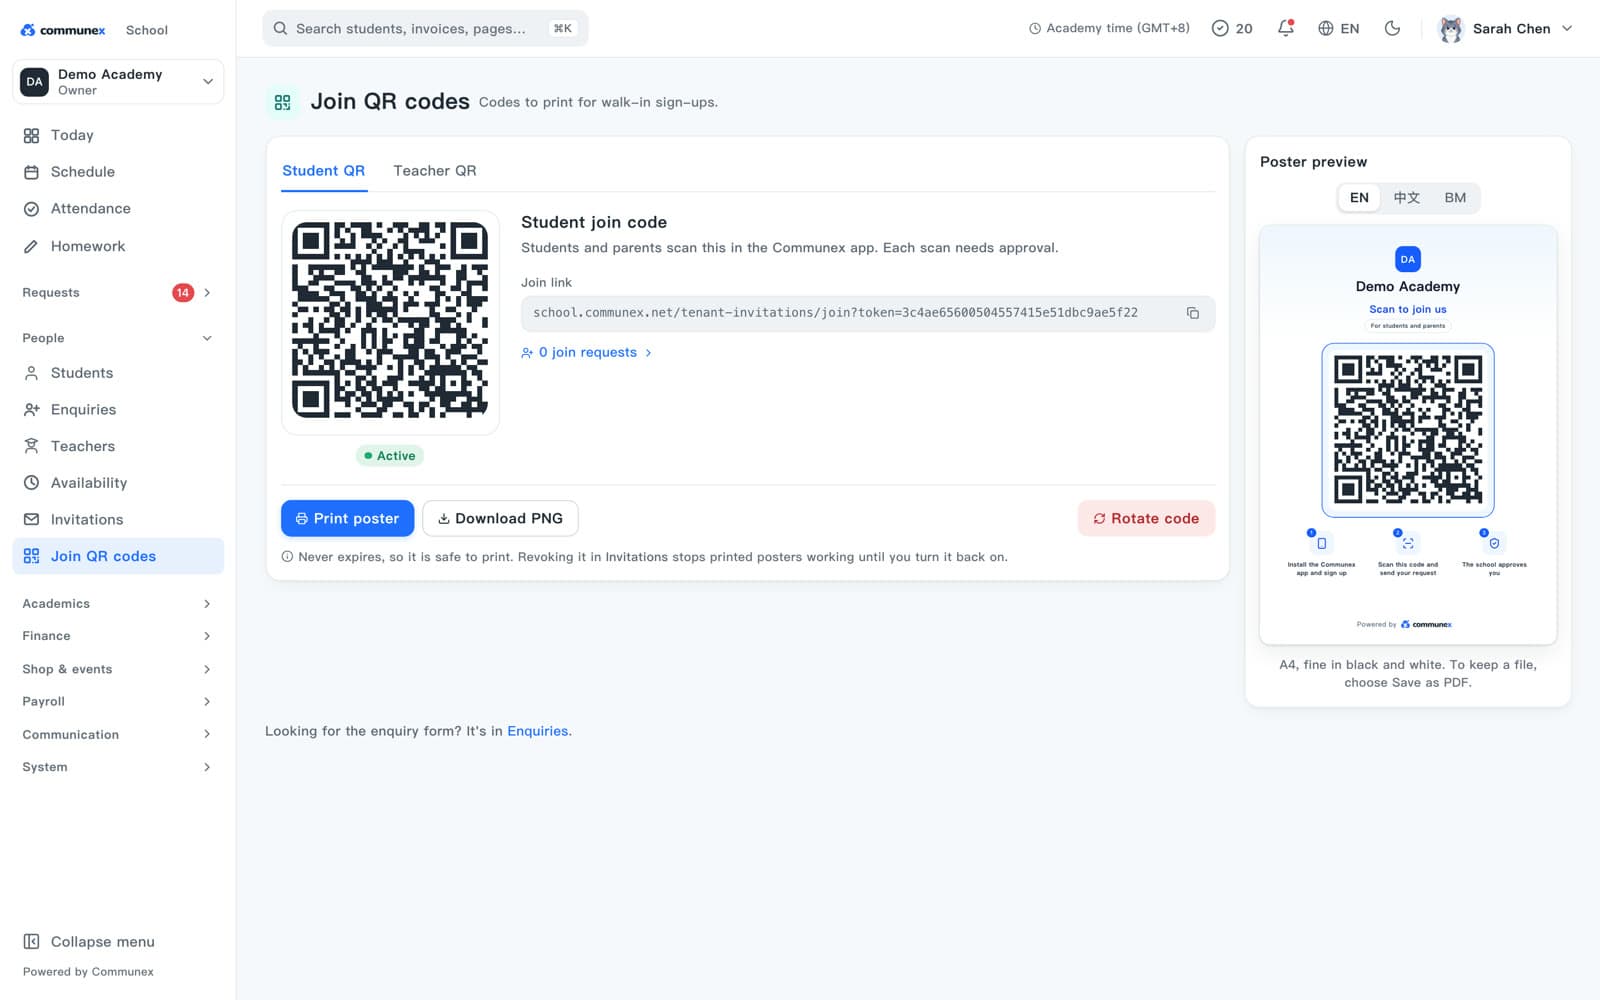
Teachers and families can also ask to join by scanning your school's QR code in the Communex app. Each request waits for your approval in Requests → Approvals.
Add students and their parents
Create a student and their parents' app accounts in one go, or import your existing list.
- Open People → Students and click New student.
- In Step 1 of 2 · Profile, type the student's Full name. Level, phone and email are optional.
- Click Next.
- In Step 2 of 2 · Login & parents, under Parent 1 enter the parent's Mobile, Full name and Email, and choose the Relationship.
- Click Create student.
- The Student created window shows what happened to each account. Click Open student to see the profile.
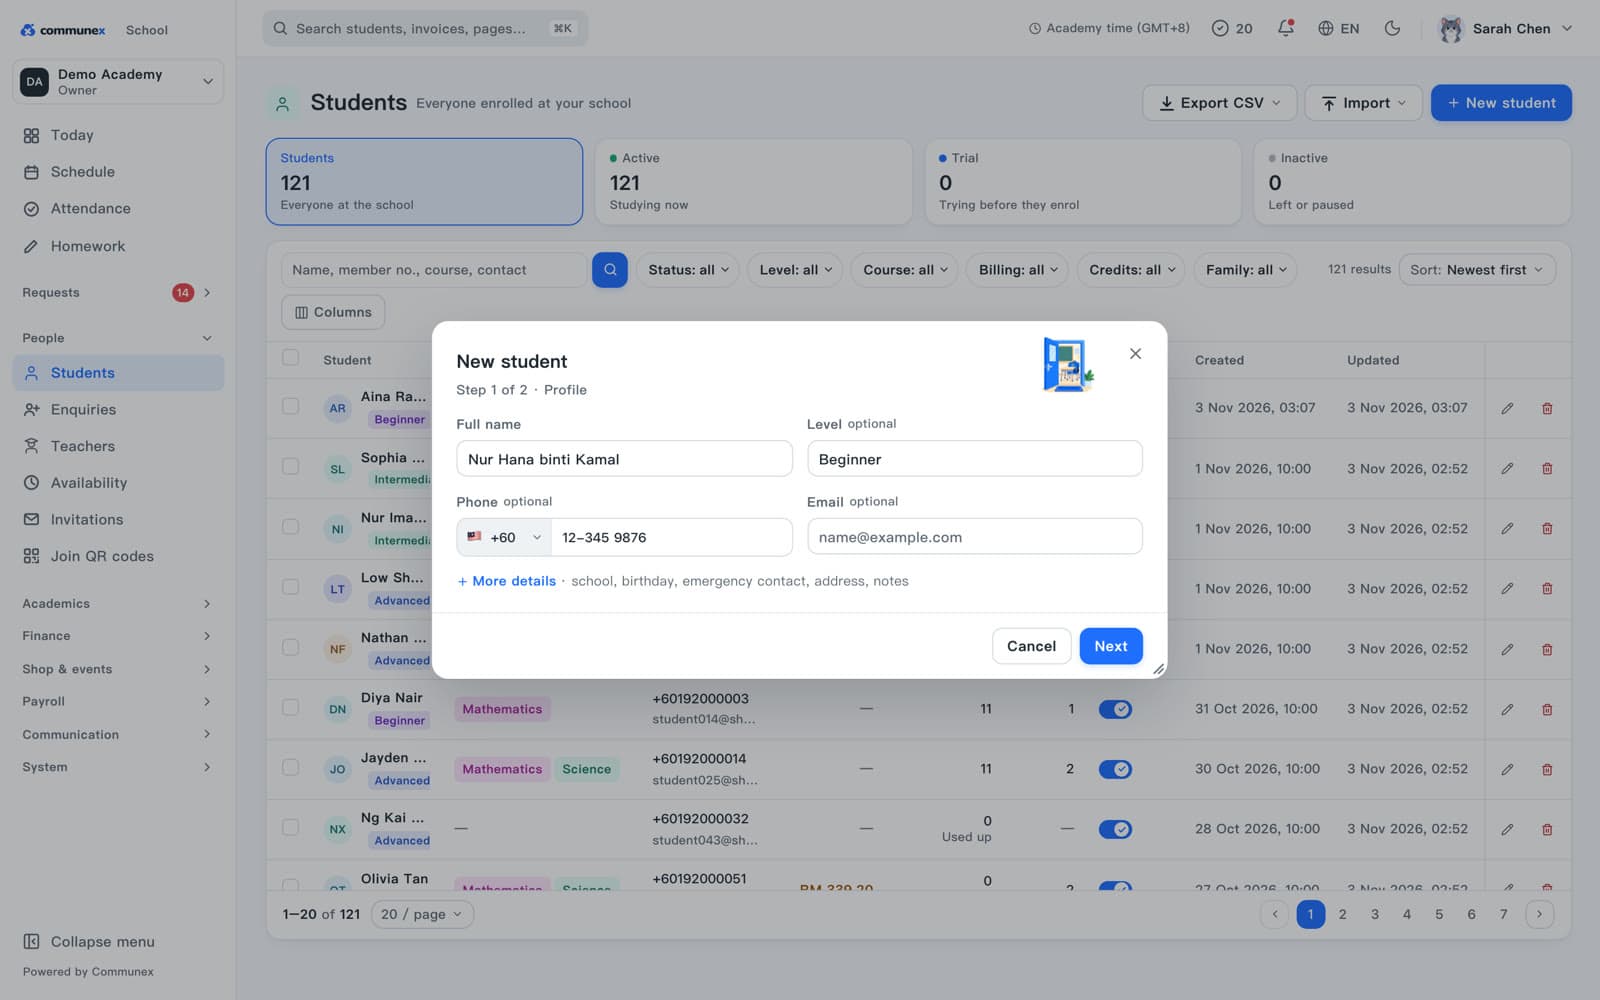
What the parent gets depends on what you entered:
- Email: an email with a link to set their password. The link works for 7 days.
- Mobile only: a one-time password, shown to you once. Pass it on in person or by WhatsApp. It works for 72 hours and they choose their own password when they first sign in.
- Already has a Communex account (for example a sibling is already at your school): the child is simply added to their family. No new account.
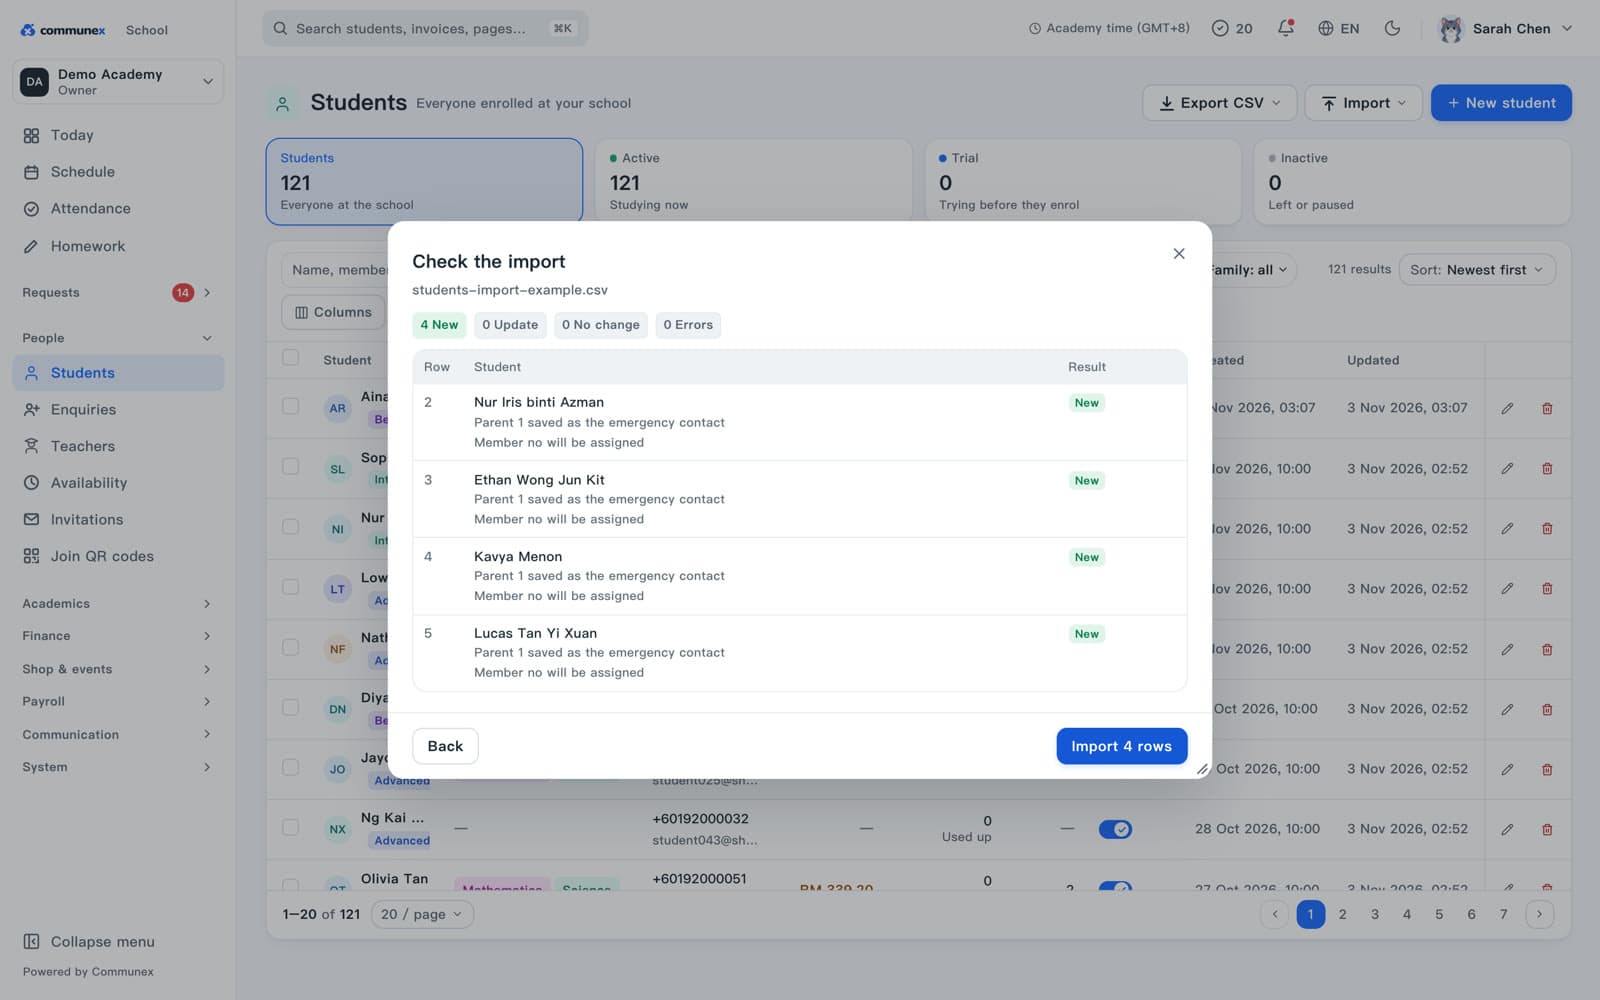
If you already have a list of students, import it instead of typing:
- On People → Students, click Import and choose Students.
- Download the template, fill it in (dates as DD/MM/YYYY) and choose your file.
- Click Check file. Communex shows how many rows are new, updated or have errors before anything is saved.
- Click Import to finish.
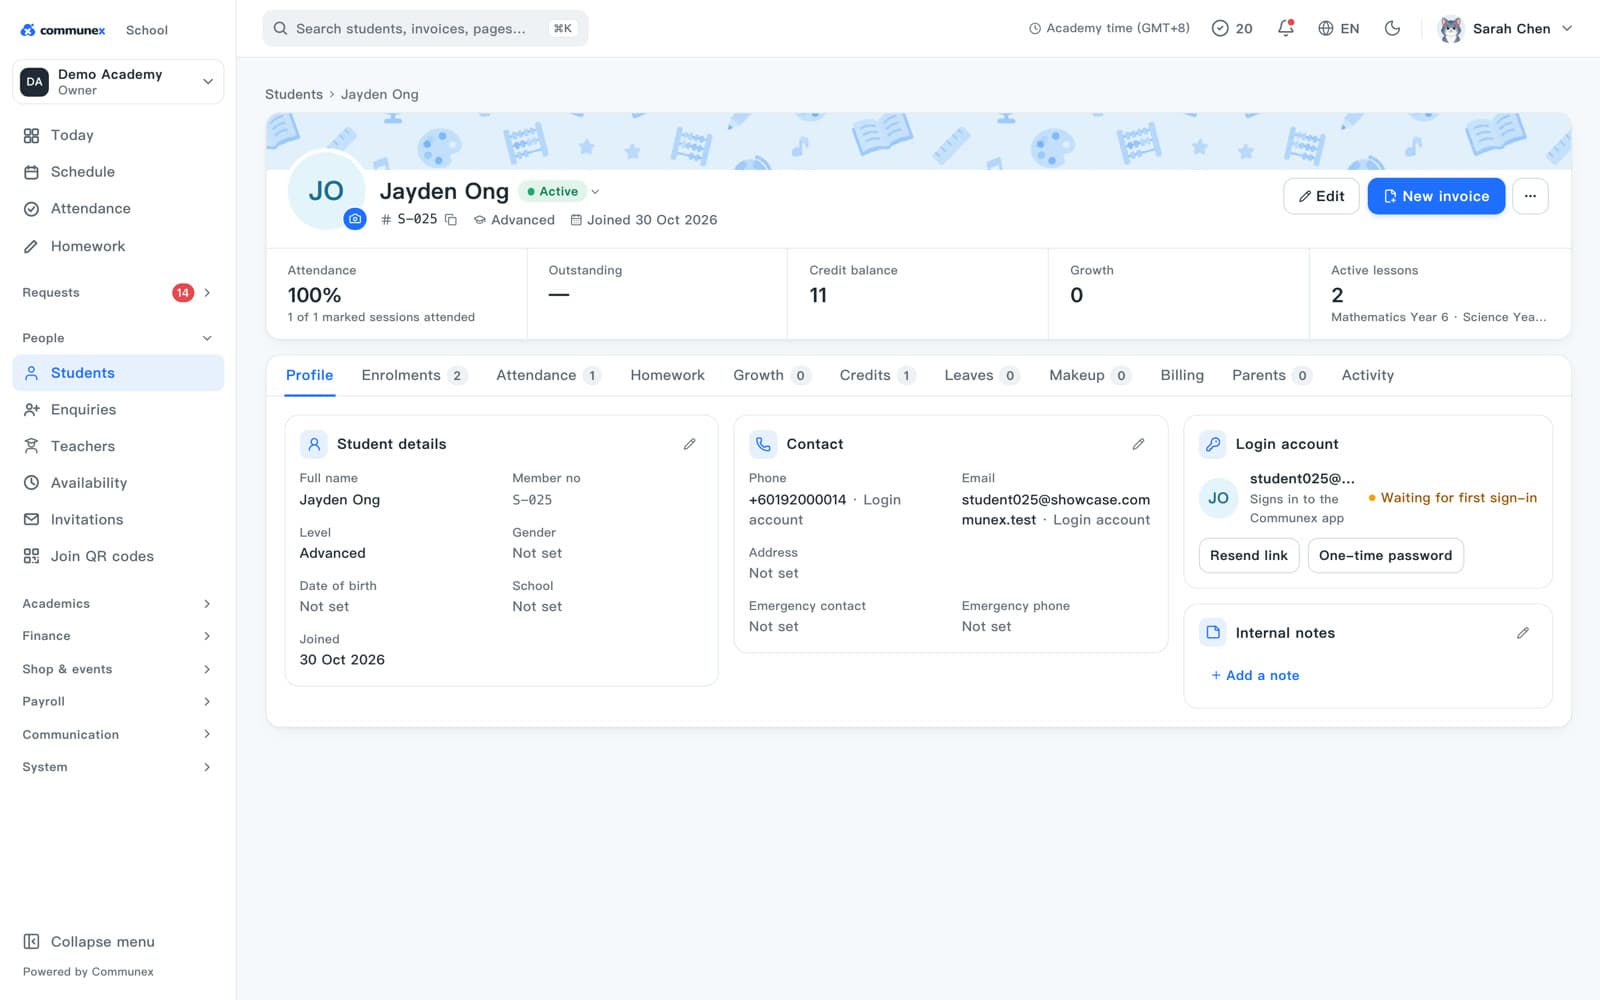
Open any student to see everything about them in one place: enrolments, attendance, homework, growth, credits, leave, make-up classes, billing and parents.
Courses, packages and classes
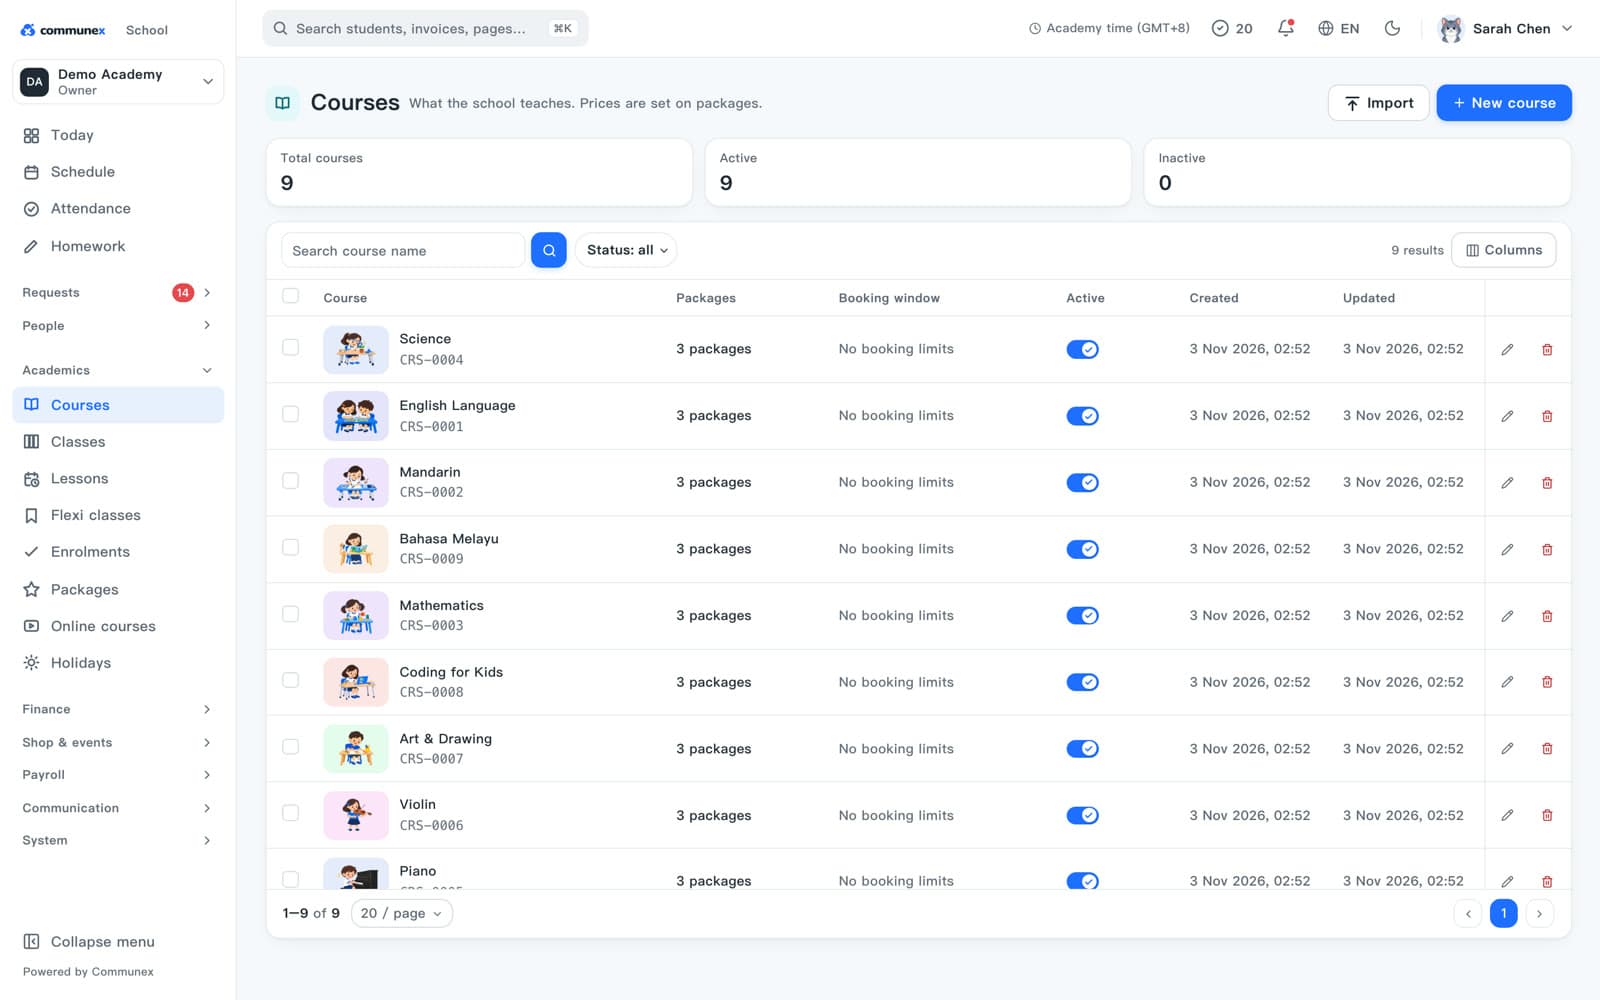
Courses are what you teach, packages are how you charge for them, and classes are the groups that meet.
Four words come up everywhere in Communex:
- Course: a subject you teach, for example Mathematics Year 6 or Piano Grade 3.
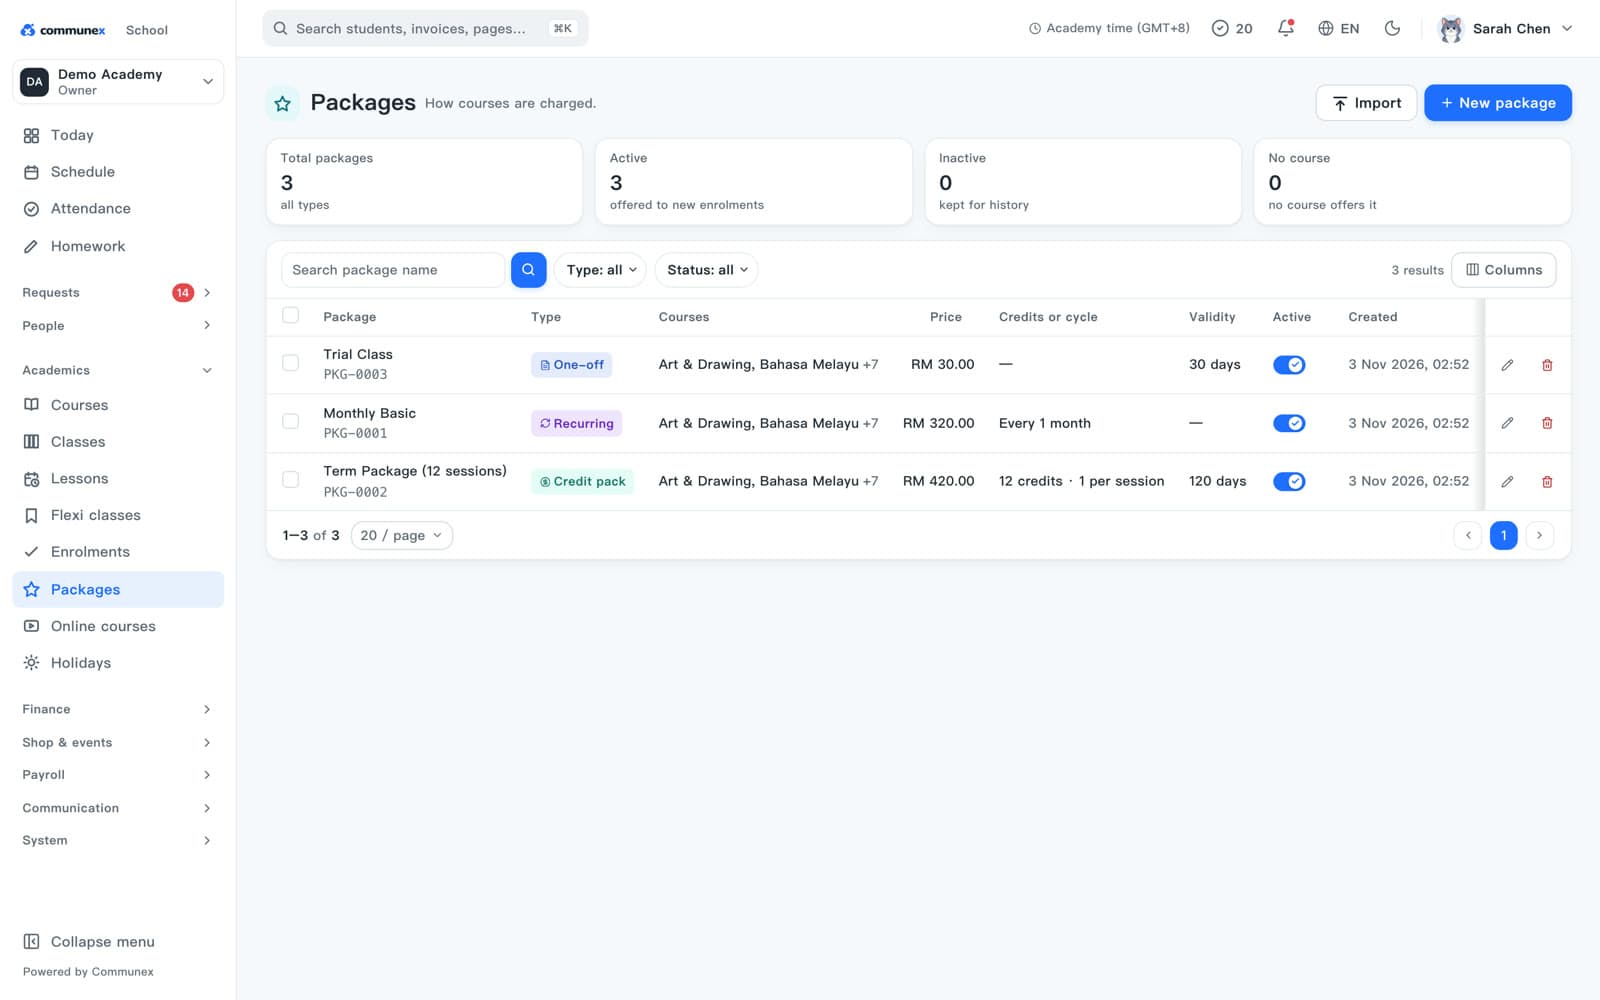
- Package: how a course is sold. One-off (a trial class), Recurring (a monthly fee) or a Credit pack (for example 12 lessons, used up as the student attends).
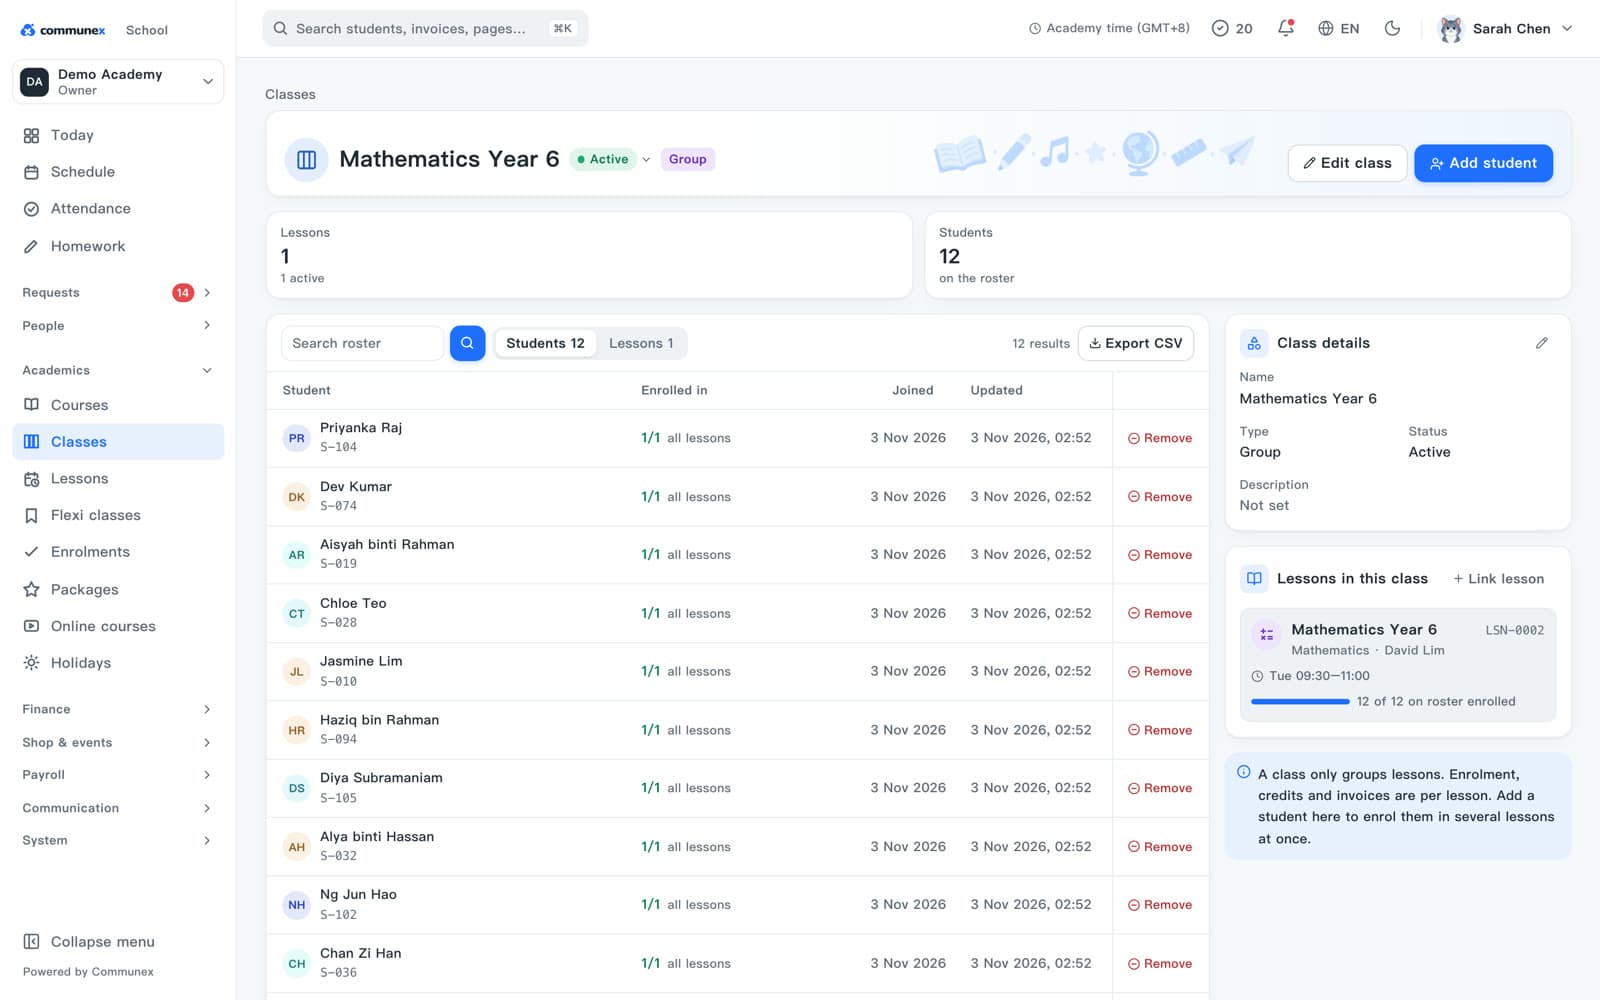
- Class: a group of students who learn together, with its own roster.
- Session: one meeting of a class on the timetable, on a given day and time with a teacher.
- Open Academics → Courses and click New course. Give it a name and choose the packages it can be sold with.
- Open Academics → Packages and click New package to set the price and type.
- Open Academics → Classes and click New class. Pick the course, the teacher and the weekly times. Communex puts the sessions on the timetable for you, skipping holidays.
The schedule
See every session by day, week, month or teacher, and add one-off sessions.
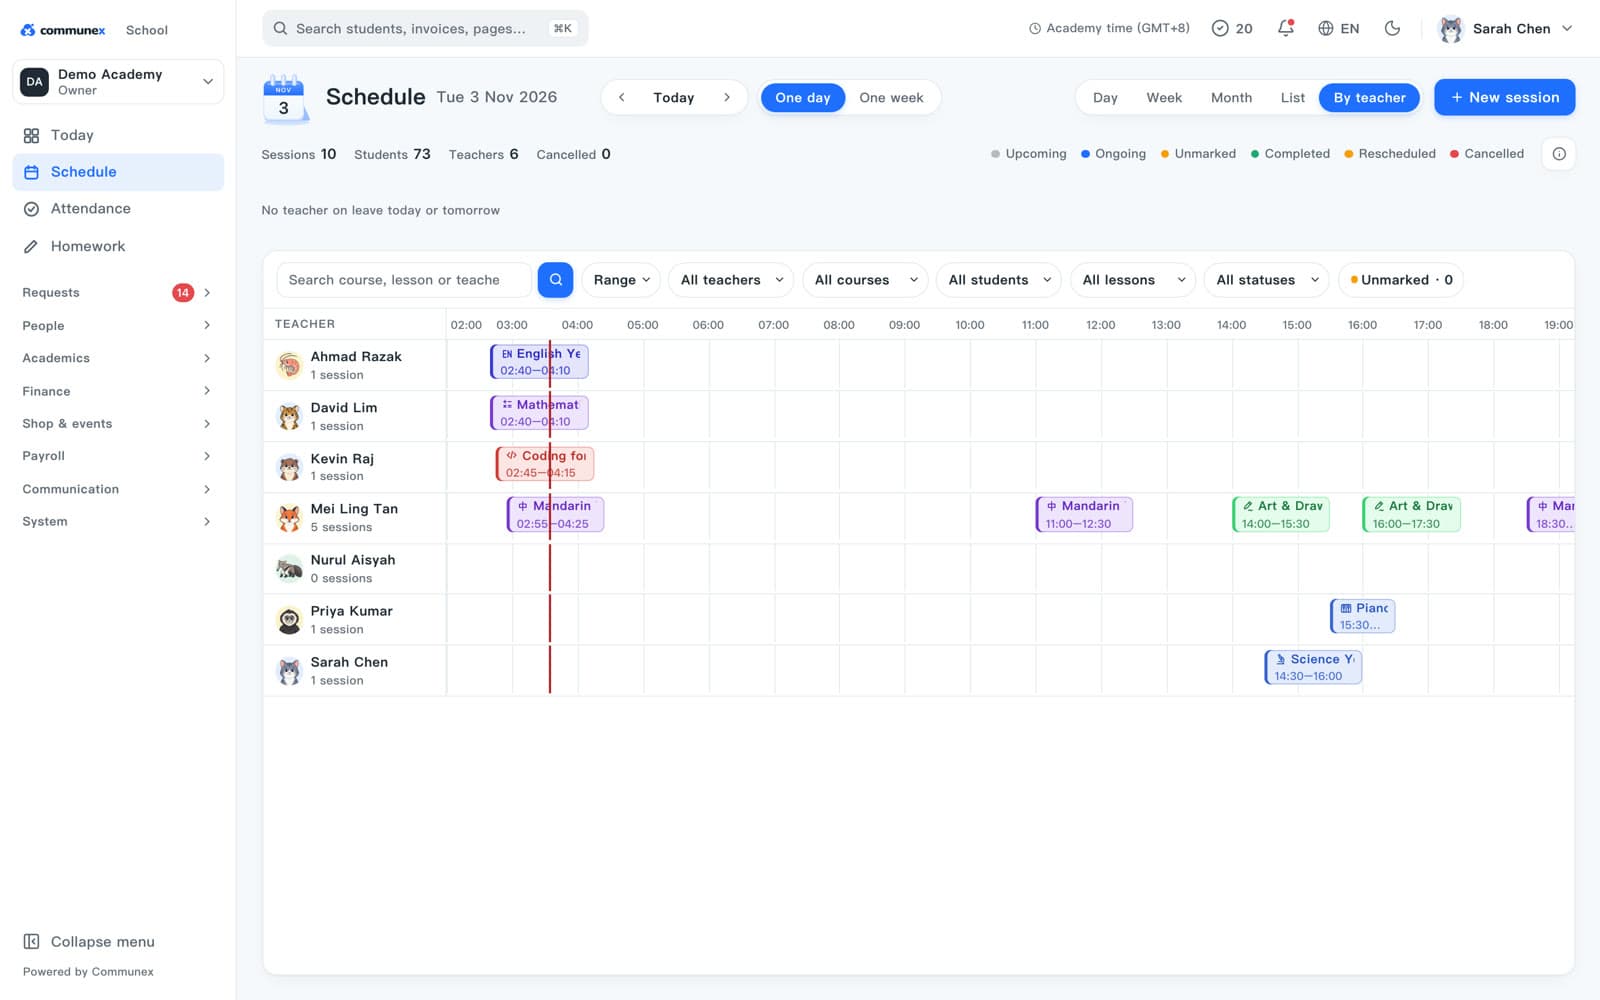
- Switch between Day, Week, Month, List and By teacher at the top.
- Click a session to open its roster, attendance and notes.
- Click New session for a one-off or 1-to-1 lesson that isn't part of a weekly class.
- When a teacher is on leave, their sessions show as needing a teacher so you can arrange cover.
Enrol a student in a class
Enrolling puts the student on every future session and creates their first invoice.
- Open Academics → Enrolments and click New enrolment.
- Under Add to an existing lesson, click Choose.
- Click Select a lesson… and pick the class. Then click Select students… and tick the students.
- Click Next. On Package & billing, choose the package. Each student's line shows what they pay today and when the next payment is due.
- Click Next. On Extras, keep or untick extra charges such as a registration fee or books.
- Click Next: Review, check the invoice and click Enrol.
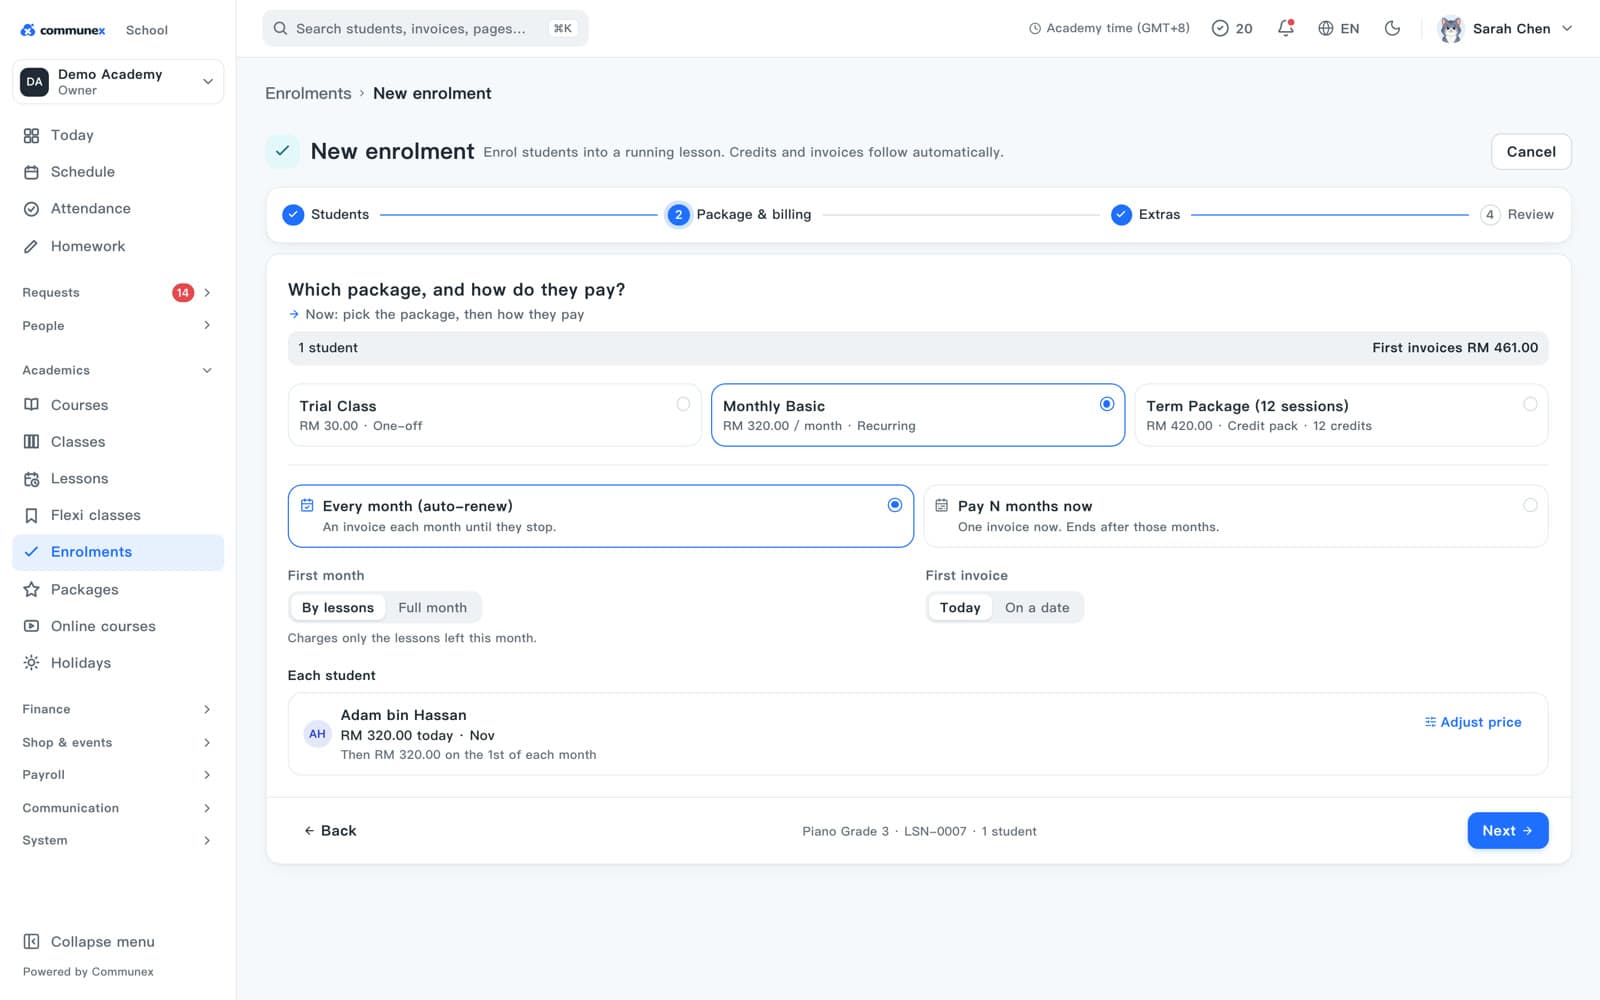
Monthly packages are billed for each calendar month, on the 1st. A student who joins in the middle of a month can pay for just the lessons left, and you can change the first month's price before you enrol.
Take attendance
Mark who came. Lesson credits are used up and parents can see it straight away.
Teachers usually mark attendance in the app at the start of class. The Attendance page lets the front desk see what's been marked and fill any gaps.
- Click Attendance in the left menu.
- Find the class that's on now and click Take attendance. Later classes show the time attendance opens.
- Click Mark all present.
- For a student who didn't come, click Absent and type the reason. For a late student click Late; the minutes are filled in for you.
- Click Save attendance.
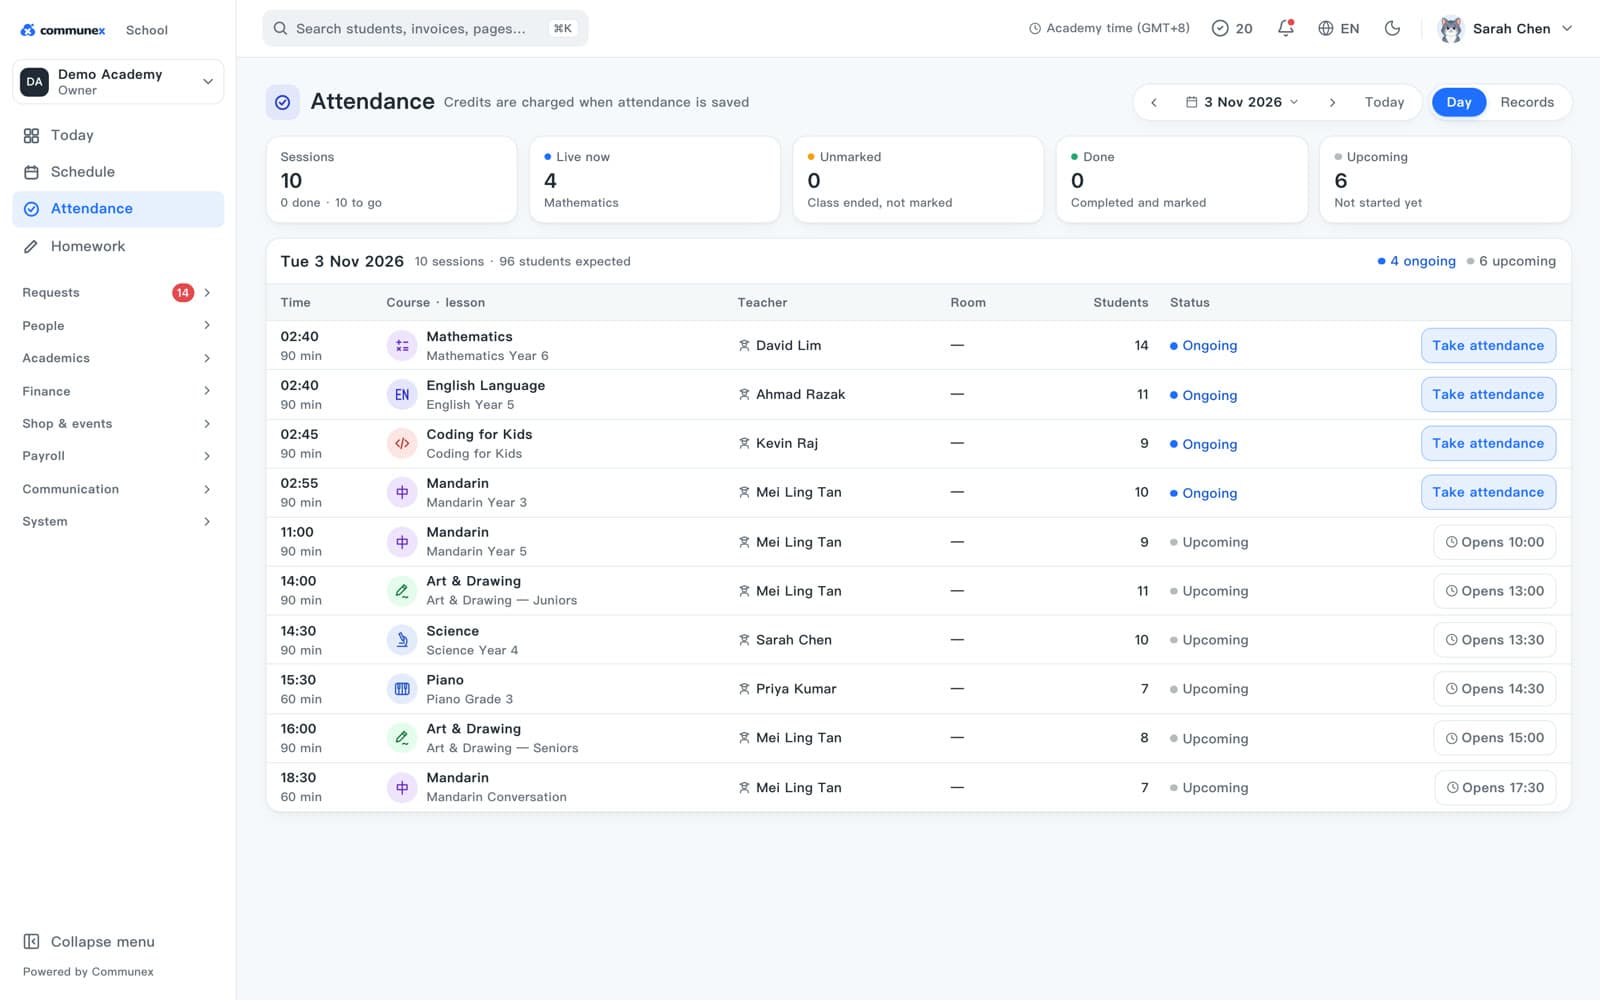
When you save, students on a credit pack use one lesson credit and parents see the record in the app. If a student has no credits left, Communex tells you how many students will owe credits before saving, so you can top them up or save anyway.
Approvals, leave and make-up classes
Everything people are waiting on is under Requests. Clear it once a day.
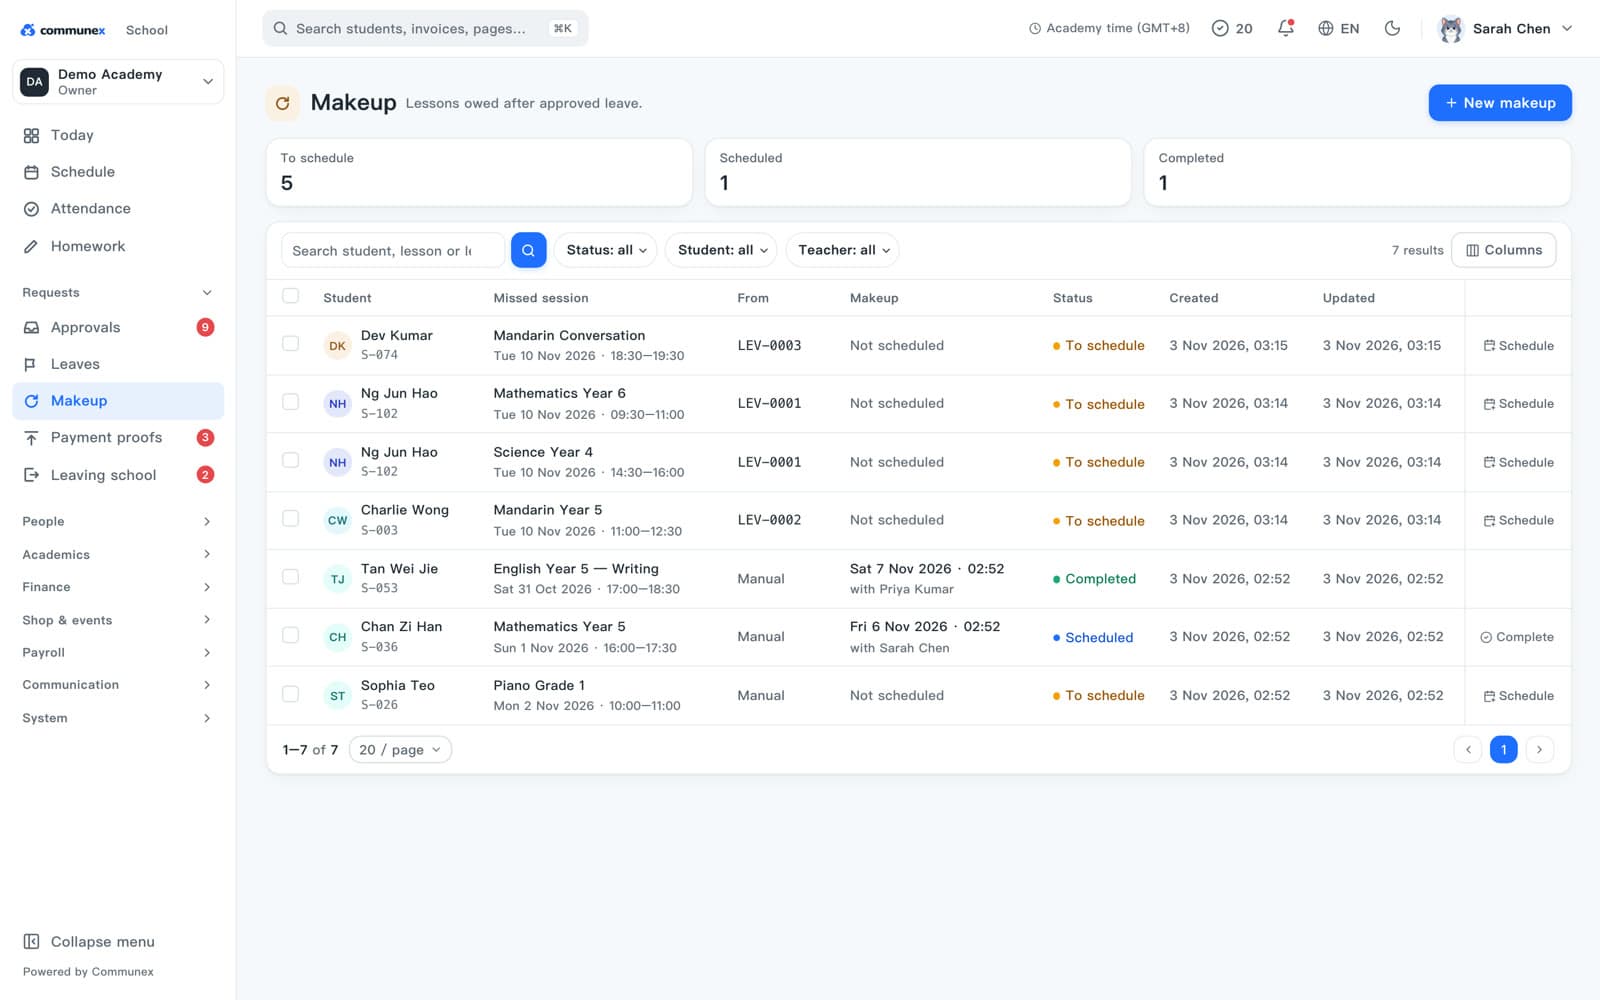
Parents apply for leave in the app, teachers apply for their own leave, and new families and teachers ask to join. All of it lands under Requests in the left menu.
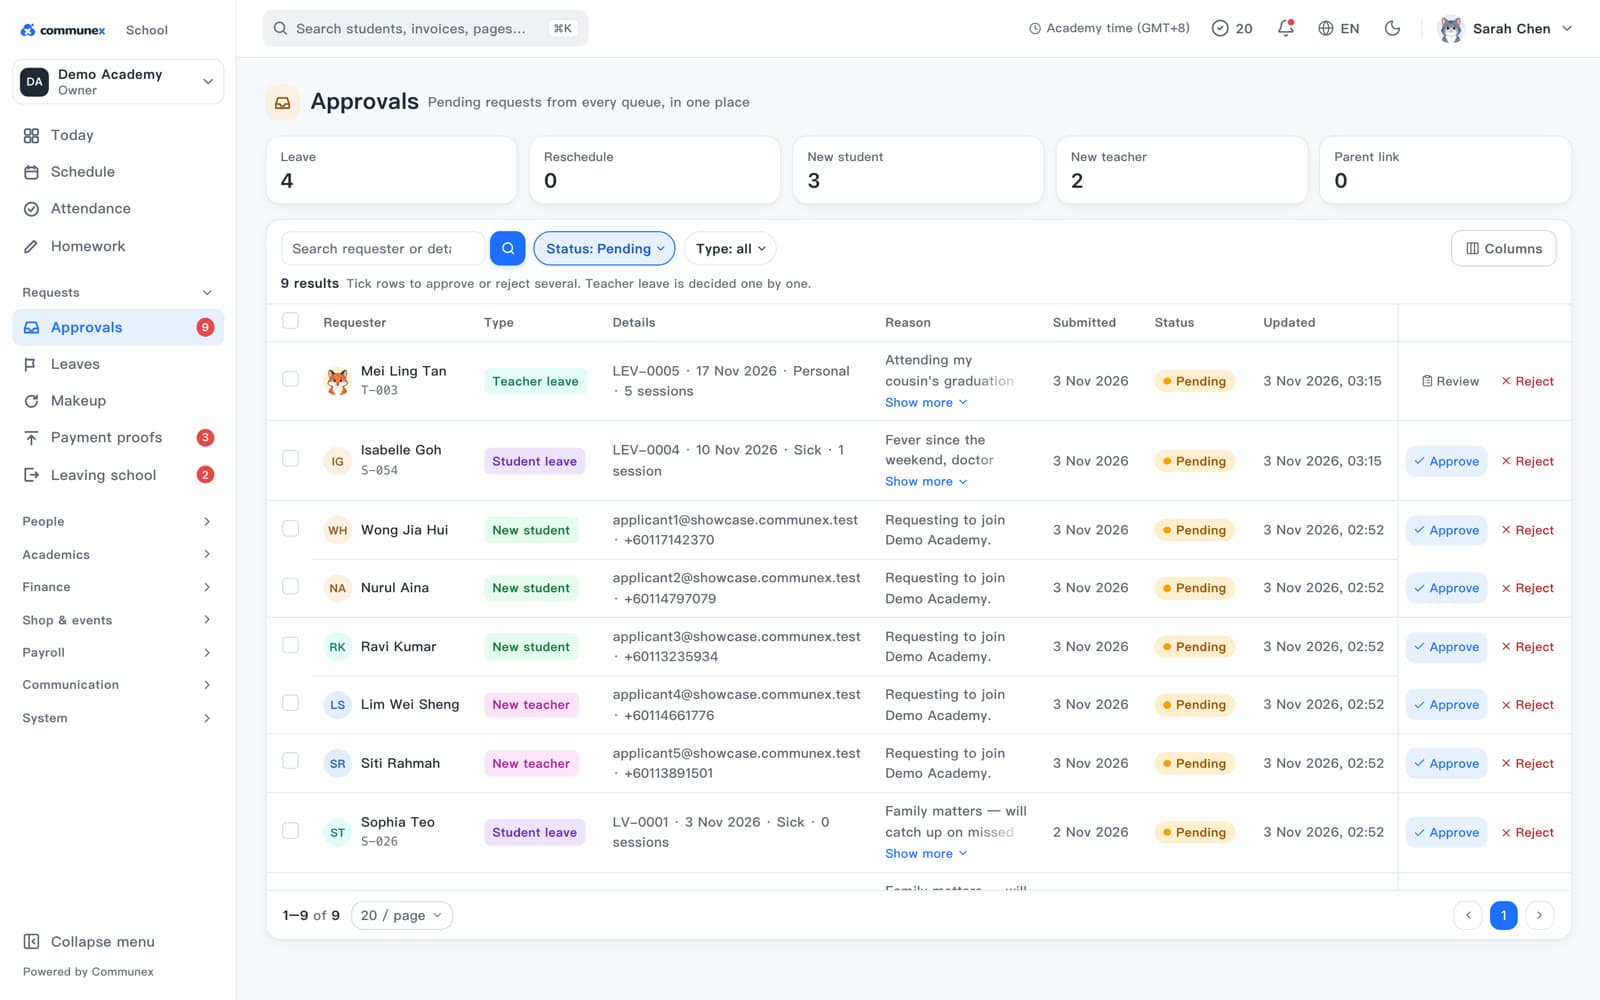
- Open Requests → Leaves.
- Find the pending request and click Approve (or Reject).
- The confirmation shows the student, the dates and the lessons affected. Click Approve leave.
When leave is approved, the student's seat on those sessions is freed and, where your school's rules allow, their credit comes back and a make-up class is due. Leave applied for at the last minute can still be charged, depending on your rules in Settings → Business policies.
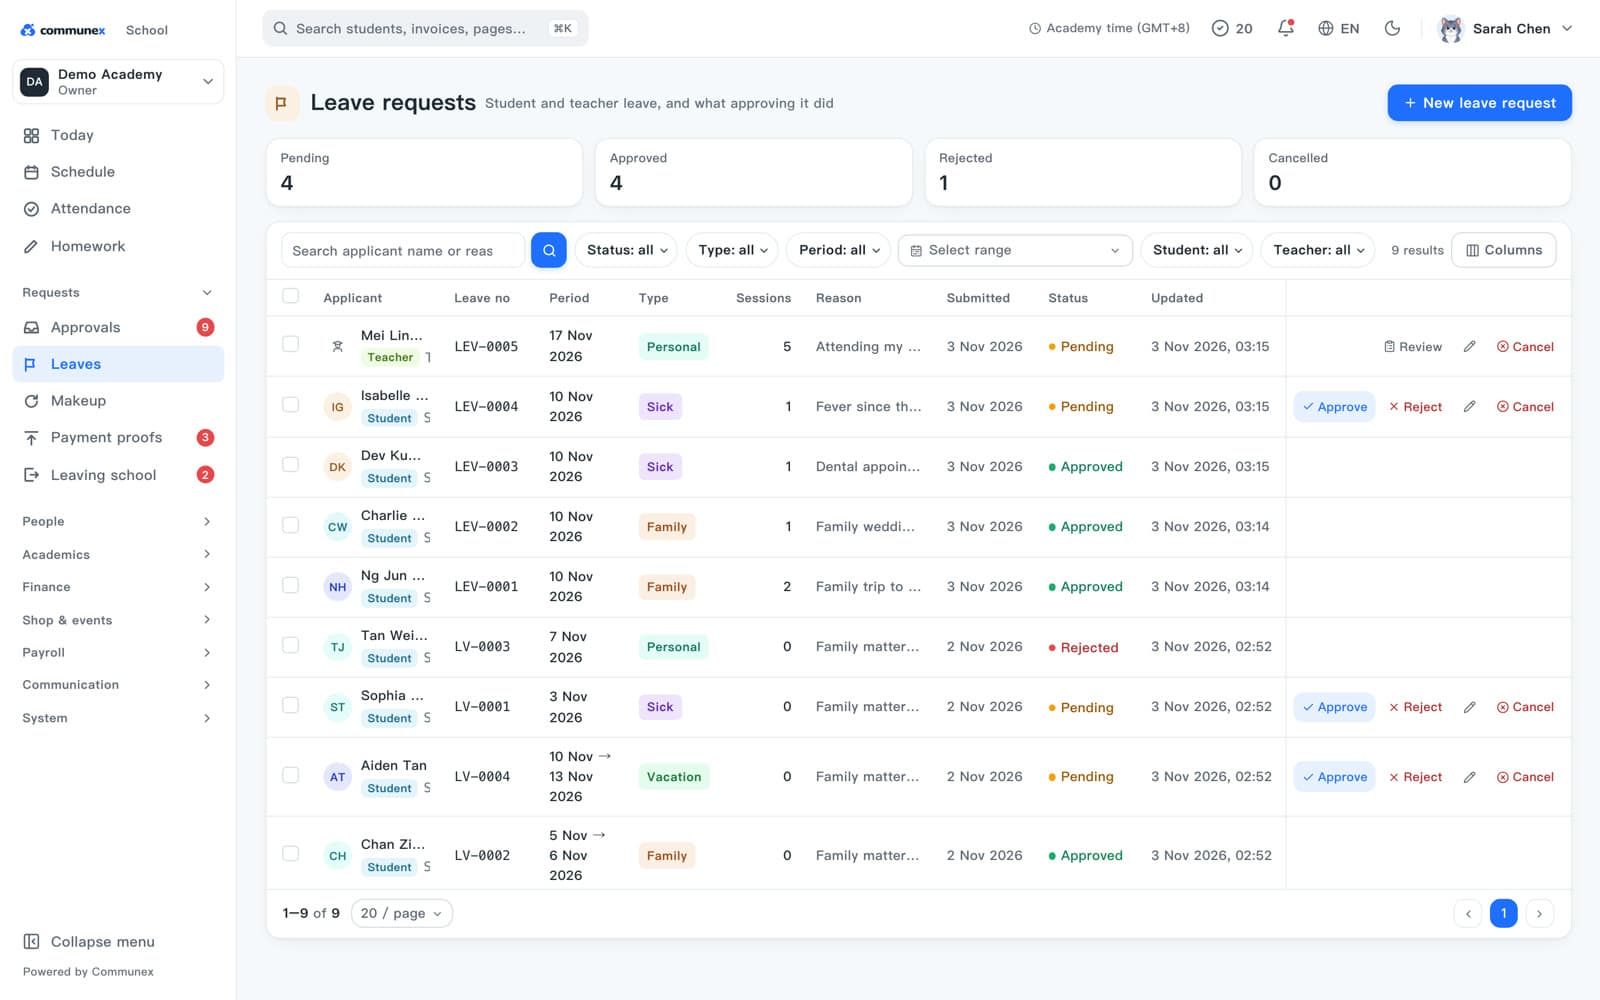
- Open Requests → Makeup to see missed lessons waiting for a make-up.
- Click Schedule next to a student and pick a session or time.
Homework
See what's been set, what's been handed in and what still needs grading.
Teachers set homework from the app after class. Here you can see all of it: drafts, what's published, what's been handed in and what still needs grading.
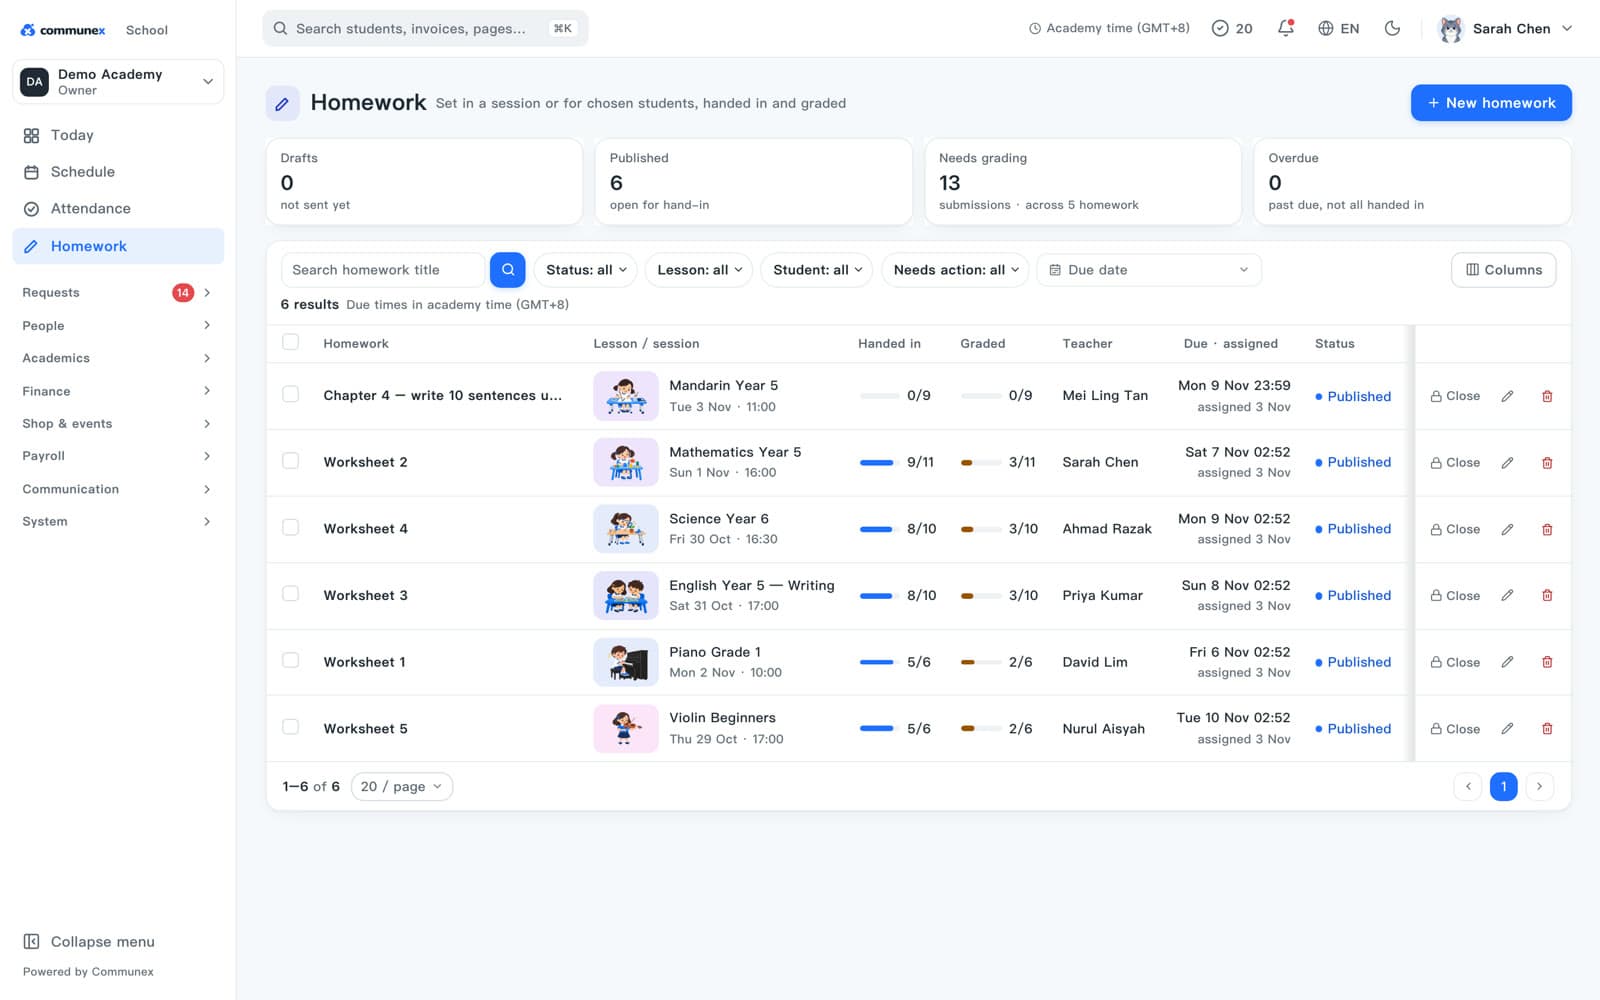
- Needs grading: work handed in that the teacher hasn't marked yet.
- Overdue: homework past its due date that some students haven't handed in.
- Click New homework to set homework from the backoffice.
Invoices and payments
Invoices are created when you enrol and at the start of each month. Record payments as they come in.
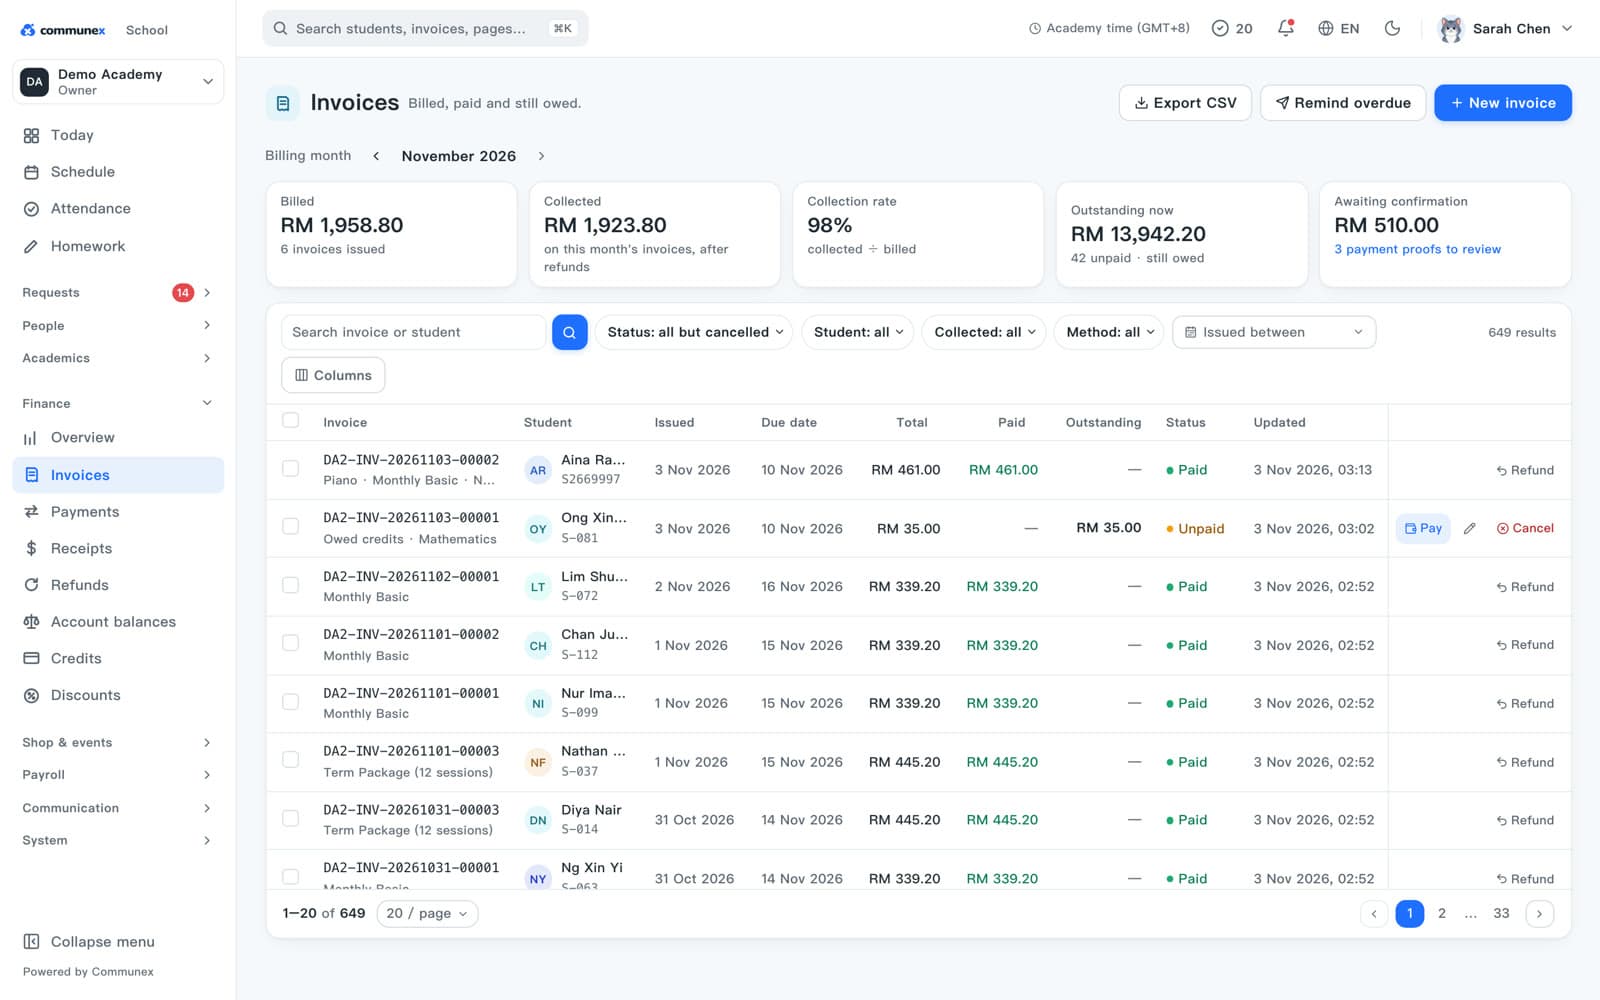
- Open Finance → Invoices and search for the student.
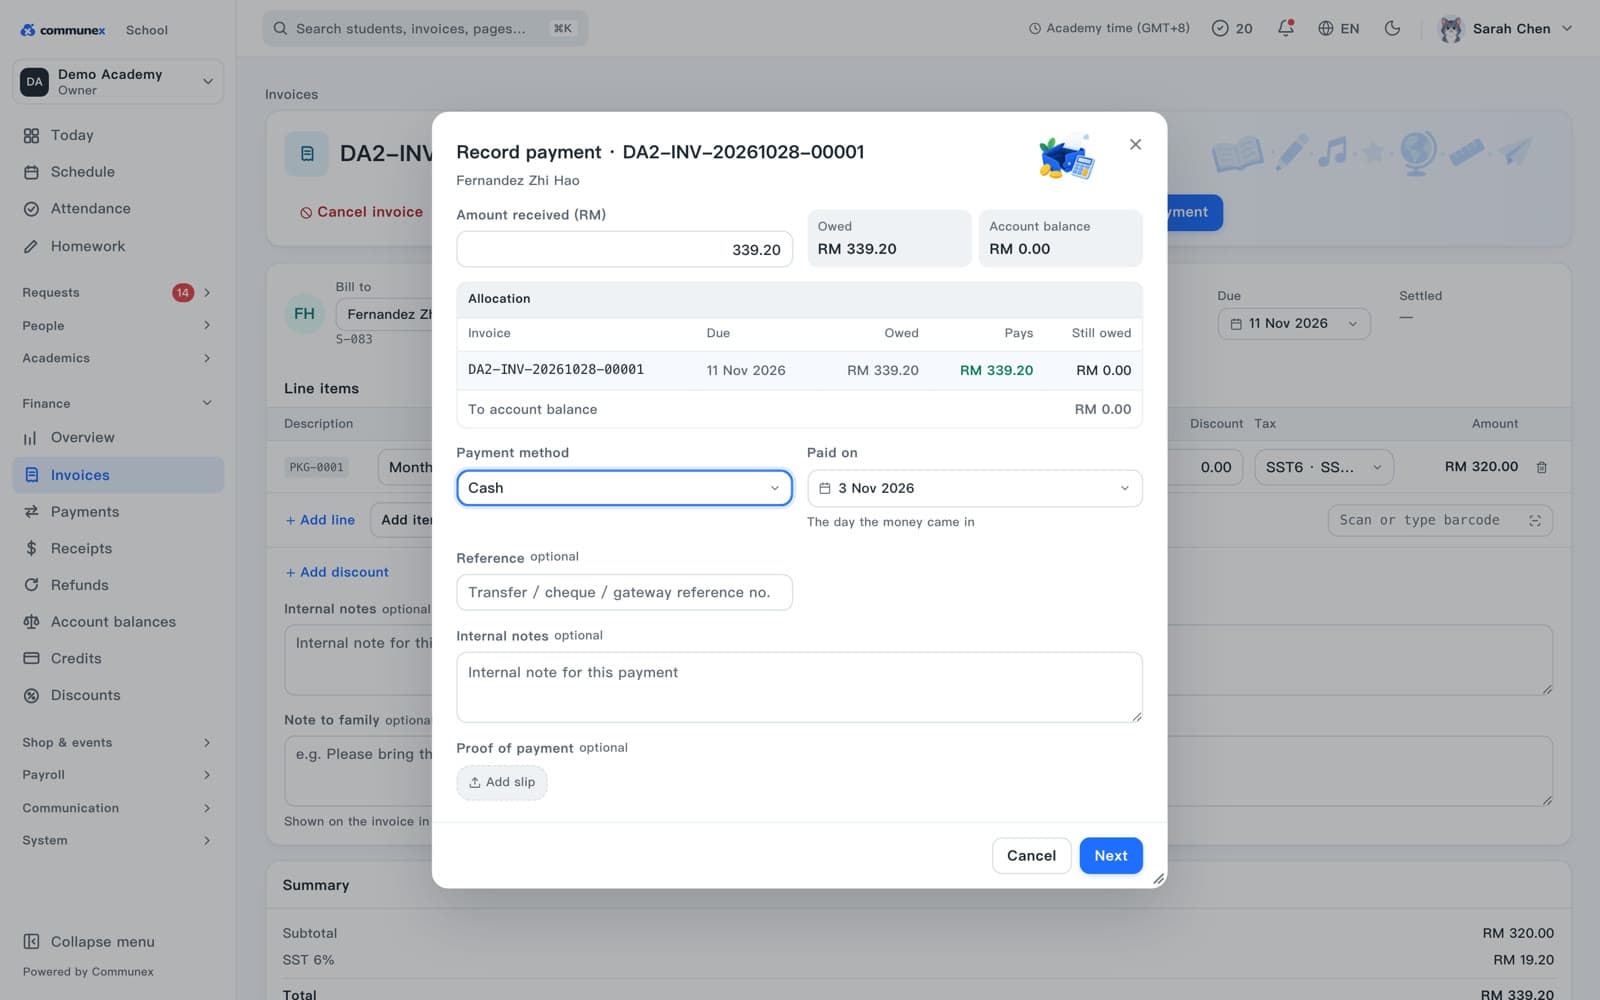
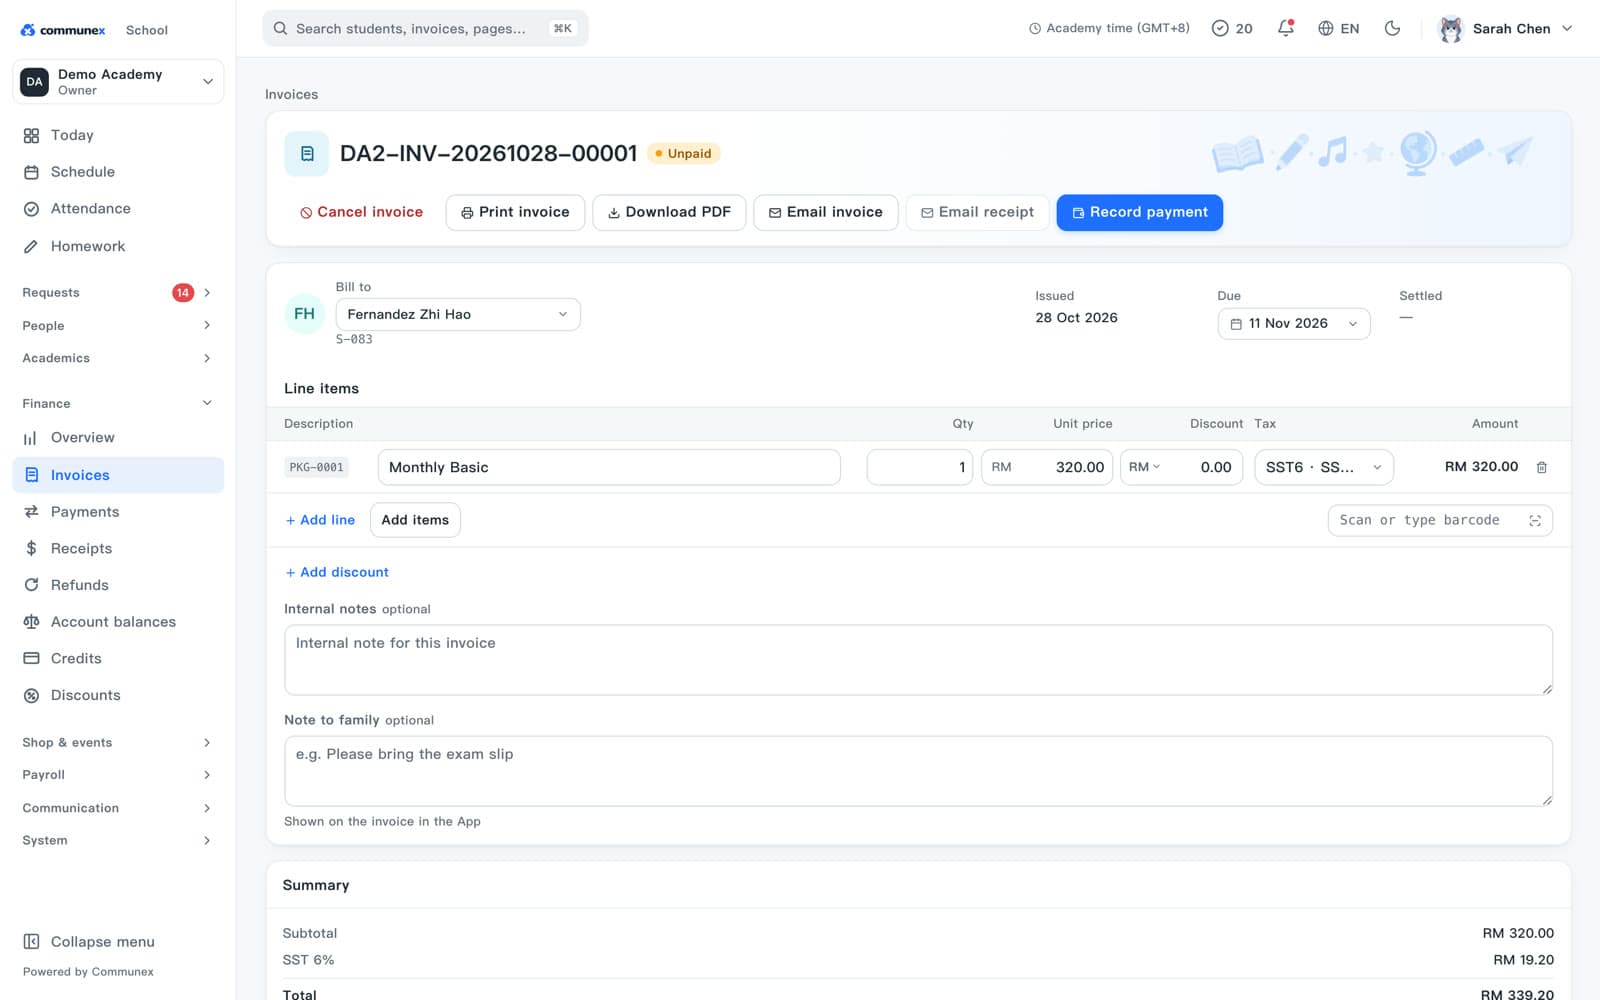
- Click the unpaid invoice, then click Record payment.
- Amount received is filled in with what's owed. Change it for a part payment.
- Choose the Payment method (Cash, Bank transfer, DuitNow QR, Card, Cheque and others) and type the bank reference if there is one.
- Click Next, check the amount and click Record.
- A receipt is issued. Click Print receipt to print it, or Done.
- From an invoice you can also Download PDF, Email invoice, Email receipt or Cancel invoice.
- Remind overdue on the invoice list sends a reminder to every parent with an overdue invoice.
- If a parent pays more than they owe, the extra goes to their account balance and is used for the next invoice.
- New invoice lets you bill something that isn't part of an enrolment, such as an exam fee.
Payment proofs and receipts
When a parent pays by transfer and uploads the slip in the app, you check it and confirm.
Parents can pay in the app online (if you've connected a payment gateway) or by bank transfer. After a transfer they upload the slip, and it waits for you here.
- Open Requests → Payment proofs.
- Click a proof to see the amount, method, reference, the parent's note and the slip.
- Check it against your bank account, then click Confirm payment. If it doesn't match, click Reject and say why.
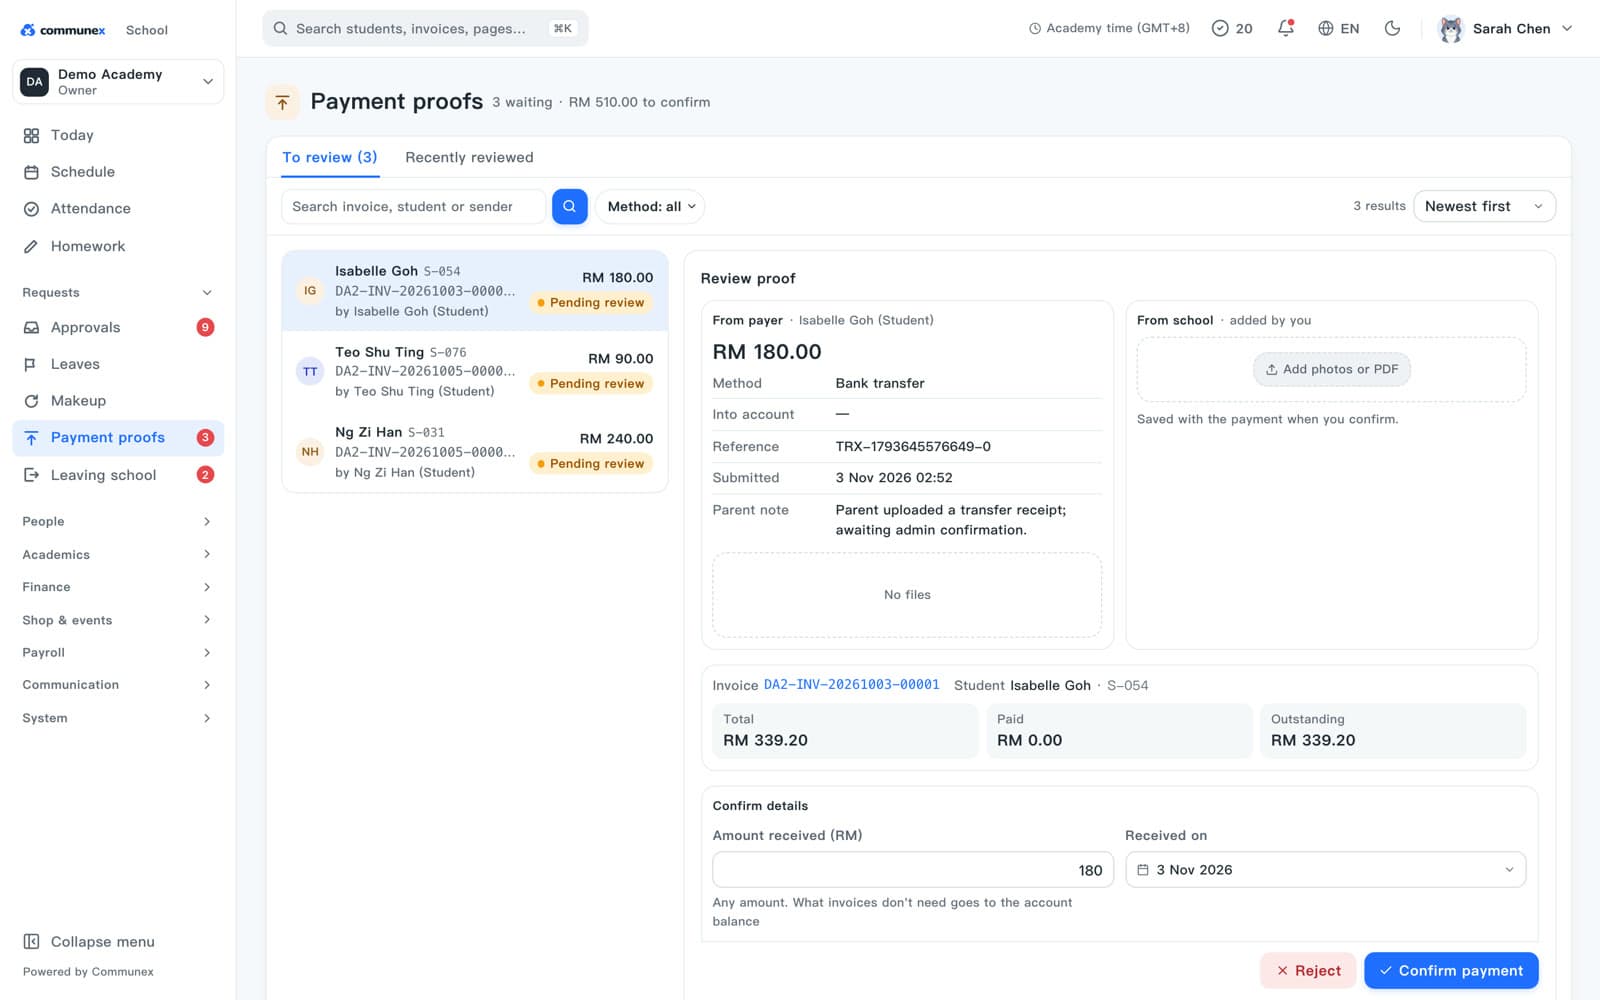
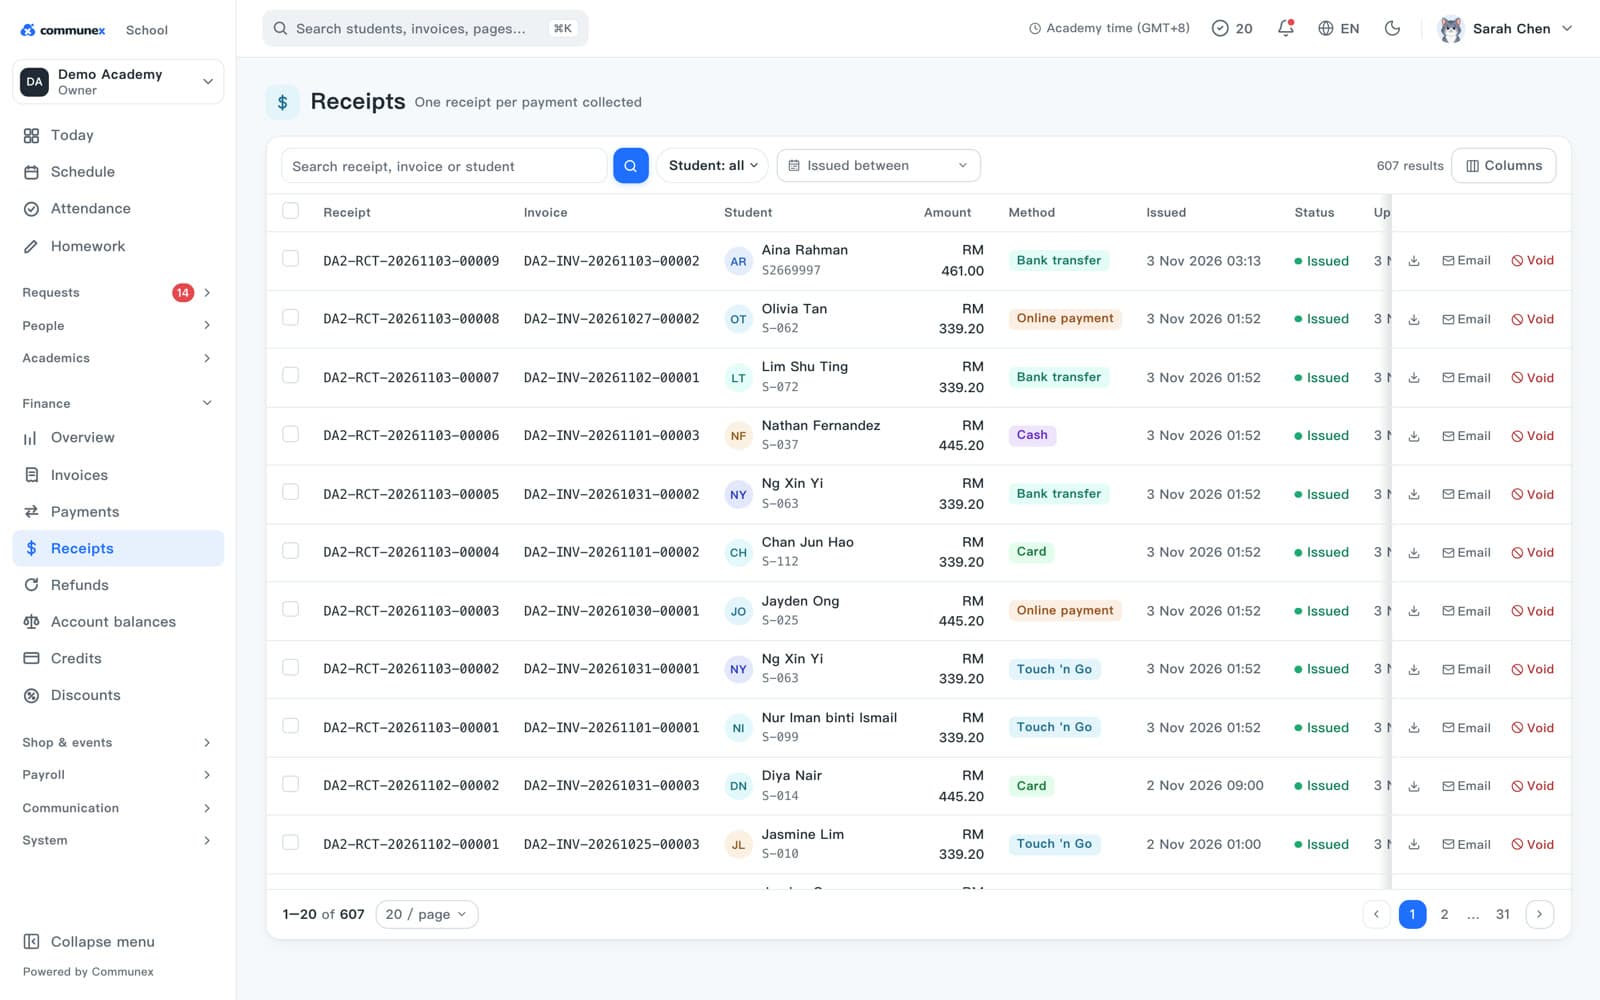
Confirming records the payment on the invoice and issues a receipt. Every receipt is listed in Finance → Receipts, where you can download, email or void it.
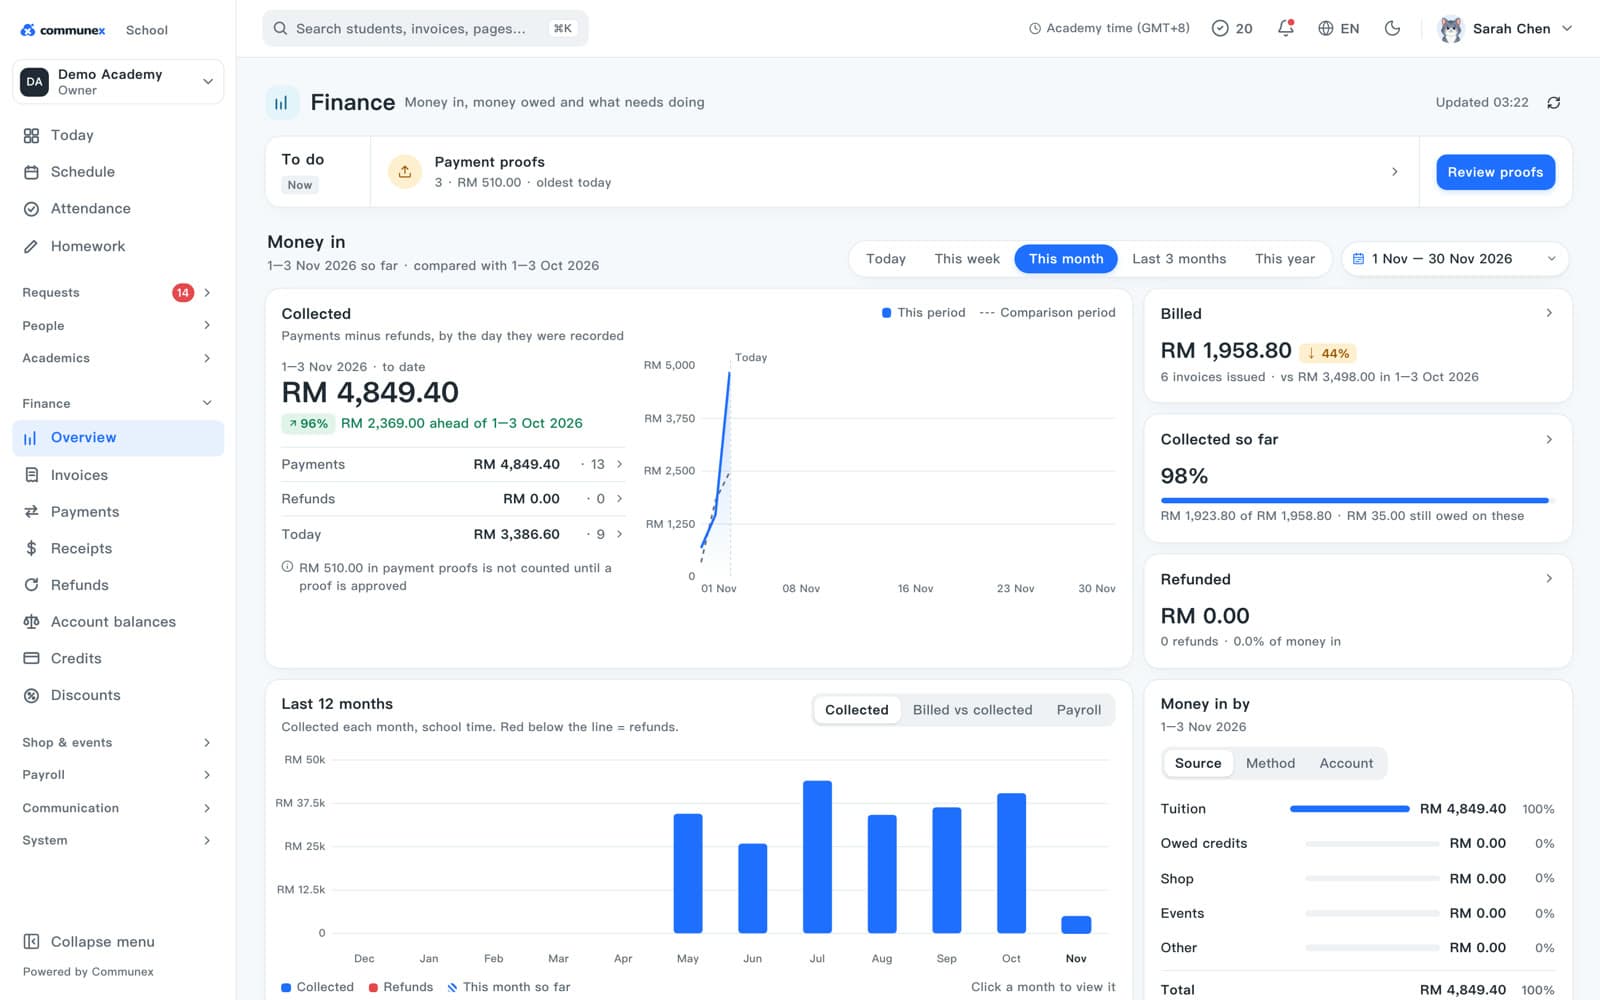
Finance overview and lesson credits
See money in at a glance, and keep an eye on students running low on lesson credits.
Students on a credit pack have a lesson balance. Each attended lesson uses a credit; approved leave can give it back. Finance → Credits shows every balance and every change.
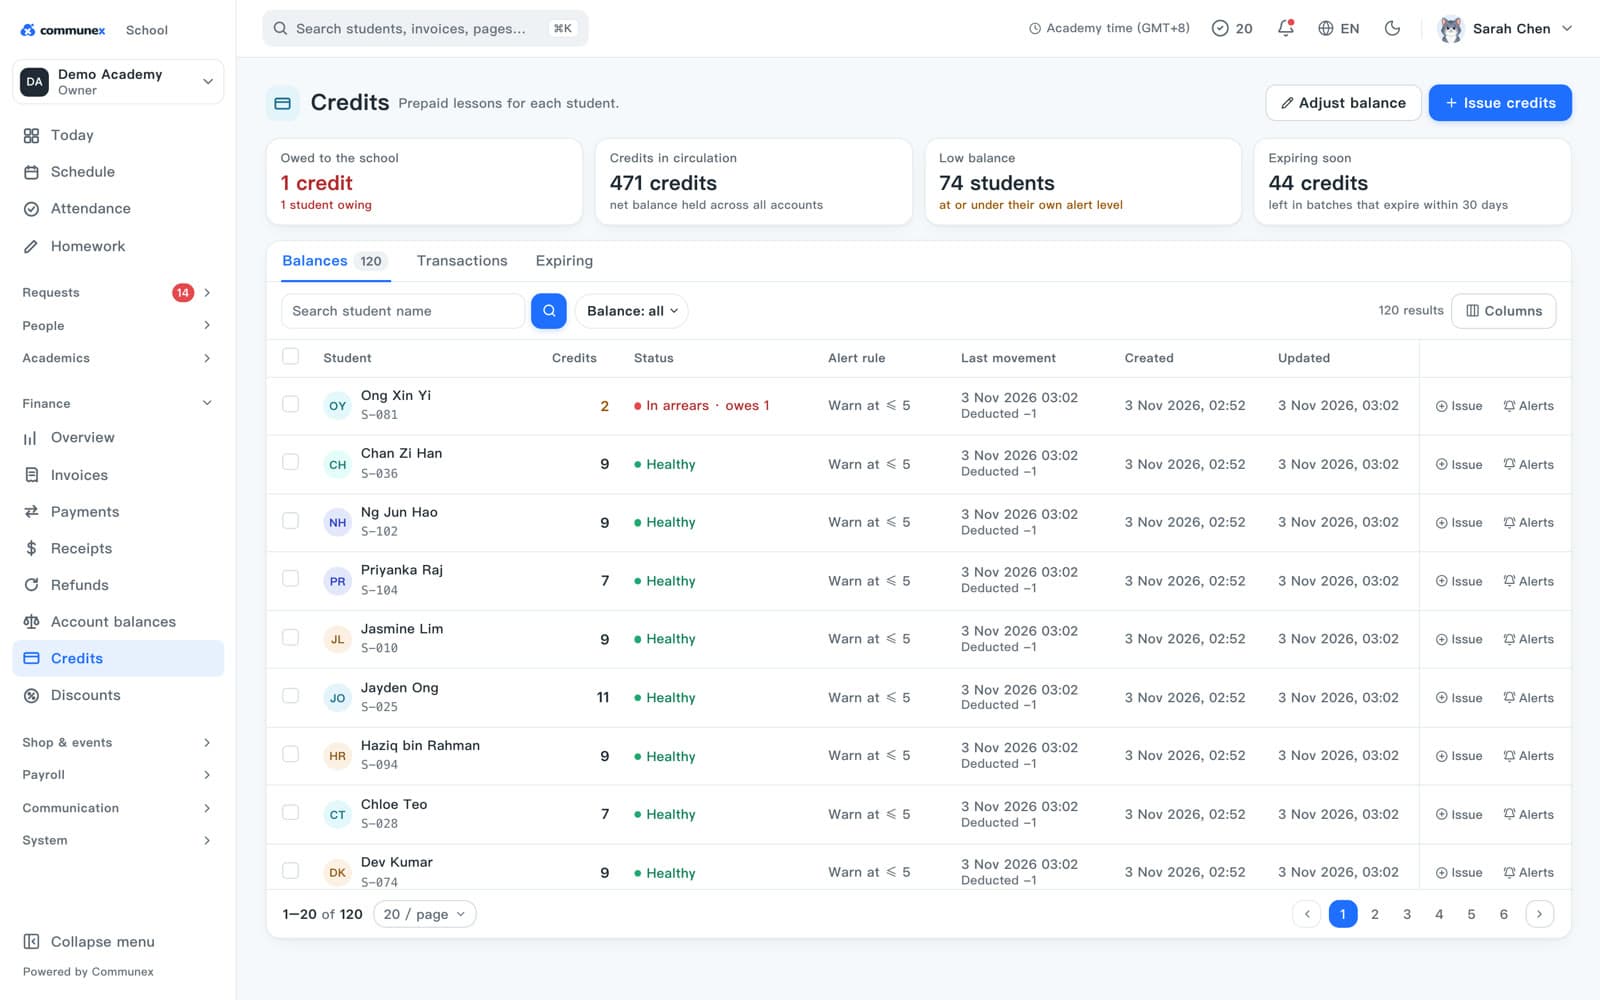
- Low balance: students about to run out. A good list to send a renewal reminder to.
- Expiring soon: credits that will expire if not used.
- Adjust balance: correct a balance by hand. You'll be asked for a reason, and it's recorded.
Send announcements
Tell parents and teachers about events, closures and changes. They get it in the app.
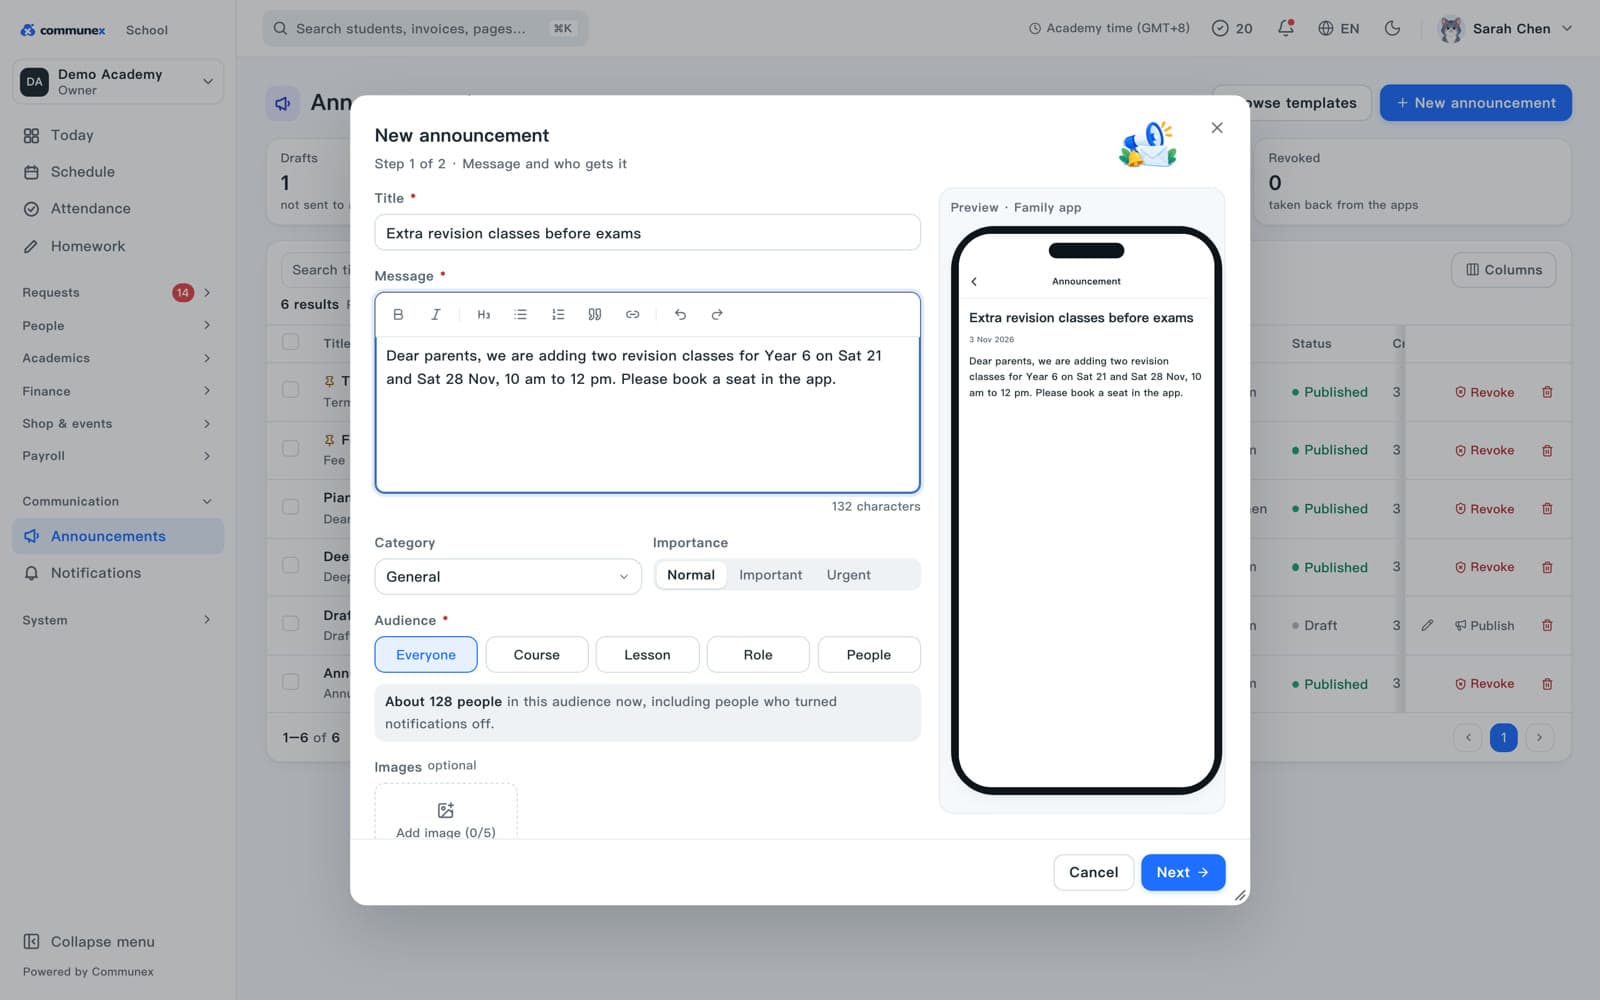
- Open Communication → Announcements and click New announcement.
- Type a Title and the Message. Add images if you like.
- Choose the Audience: Everyone, or a Course, Lesson, Role or chosen People.
- Click Next. Turn on Push notification so phones get an alert. (The in-app inbox is always on.)
- Click Publish now…, check the summary and click Publish now. You can also schedule it for later.
Reports and the activity log
Export the numbers, and see who changed what.
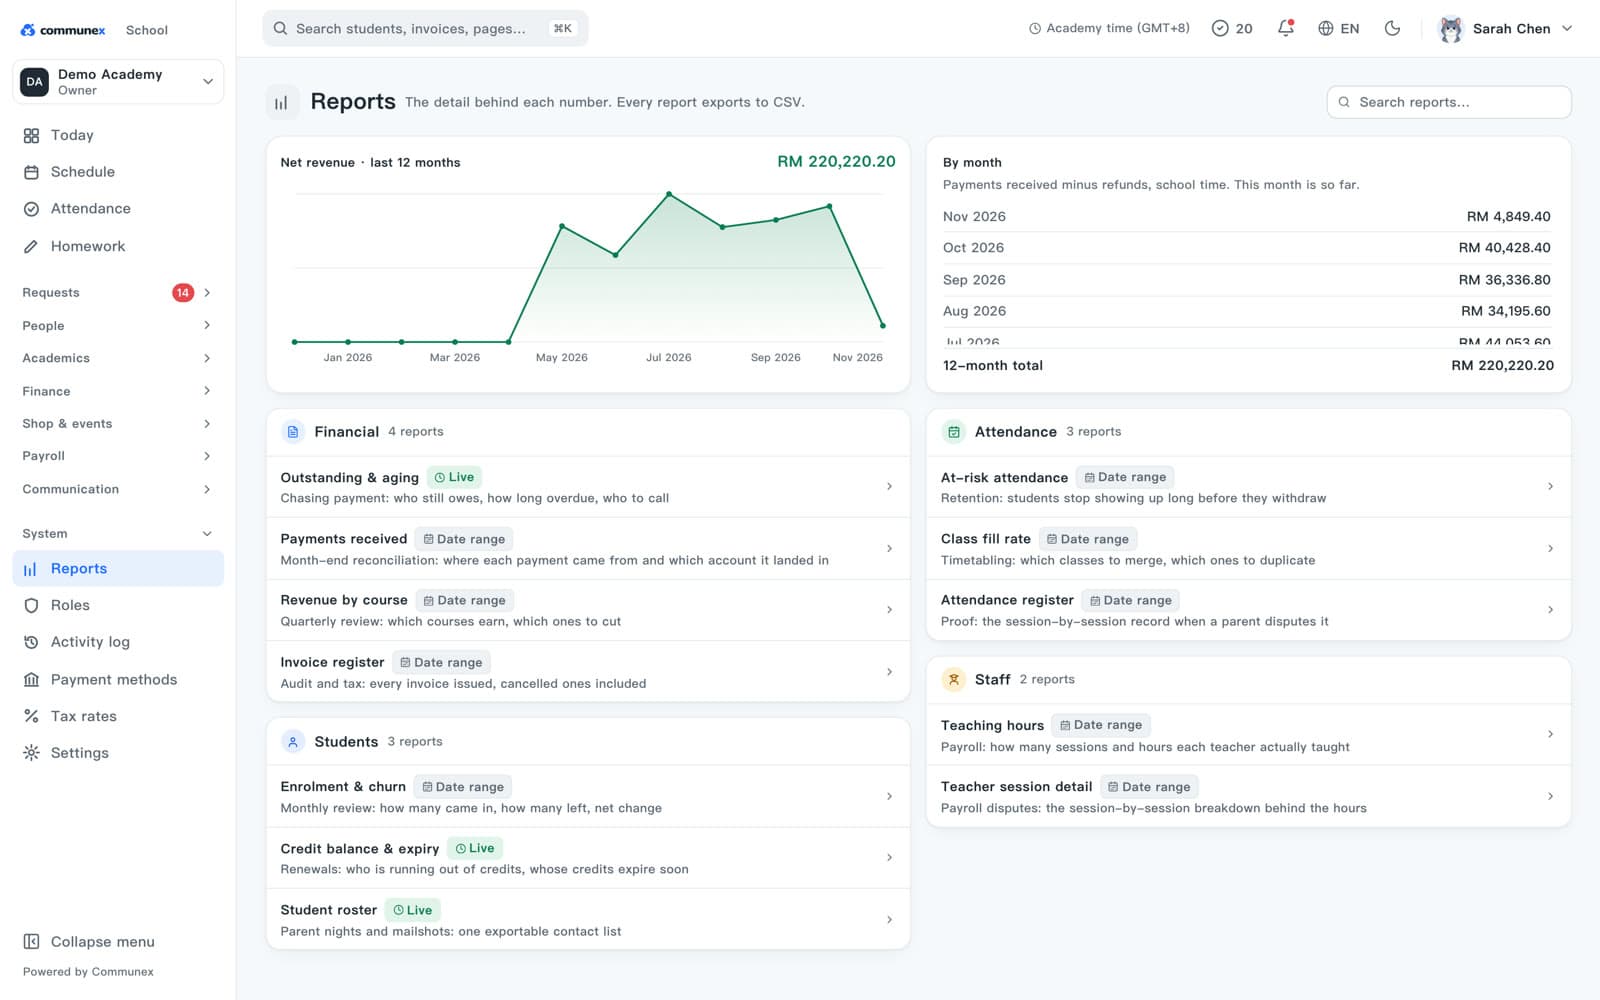
Reports are grouped into Financial, Attendance, Students and Staff. Each one downloads as a CSV file you can open in Excel or Google Sheets.
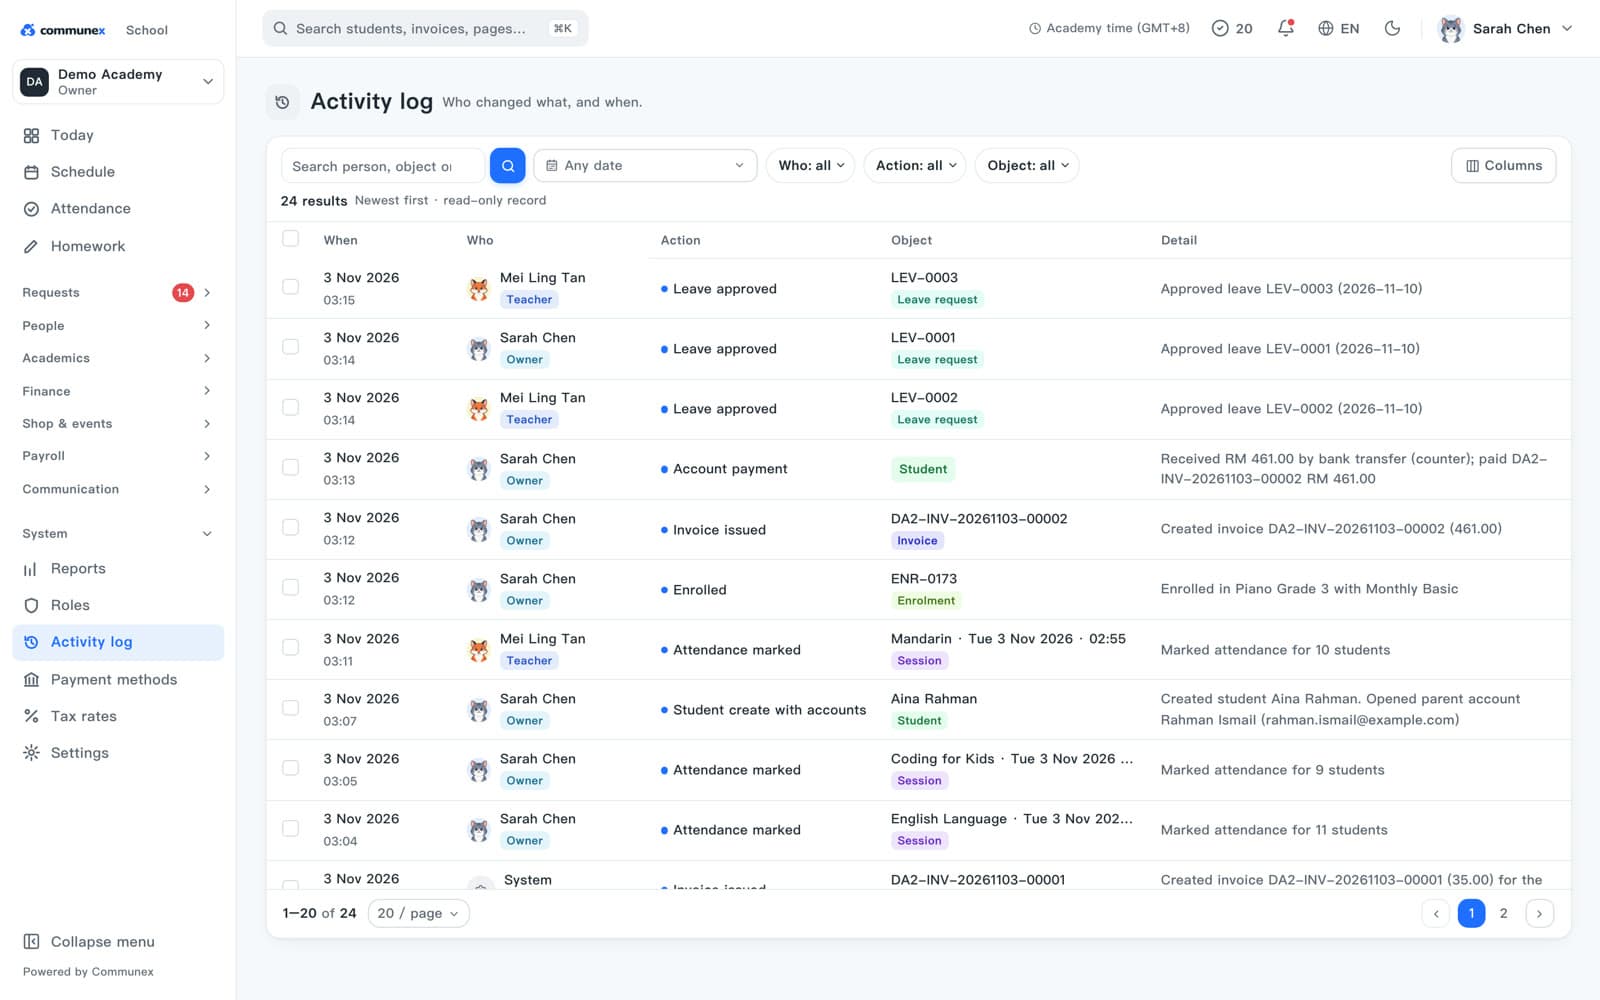
The activity log records every important change: who approved a leave, who recorded a payment, who changed attendance. Filter it by person, action or record when you need to check what happened.
Your routine
Every day
- Open Today and check To mark
- Clear Requests: approvals, leave and payment proofs
- Make sure every class has attendance before you leave
Every week
- Look at next week's Schedule for teacher leave and gaps
- Schedule make-up classes
- Check Credits → Low balance and remind those parents
Every month
- Check the month's invoices on the 1st
- Use Remind overdue for unpaid invoices
- Export the reports you share with the owner or accountant
Still stuck? We're happy to walk you through it.